Contributor Setup: From Login to First Pull Request
STACKIT
Last updated on


Set up your authoring environment step by step: sign in once, create a token, pull the dev container, preview the site locally, and open a pull request.
Five things are yours: fork the repository, start the dev container, run hike, run patrol and open the pull request. The checks, the preview site and the merge run by themselves.
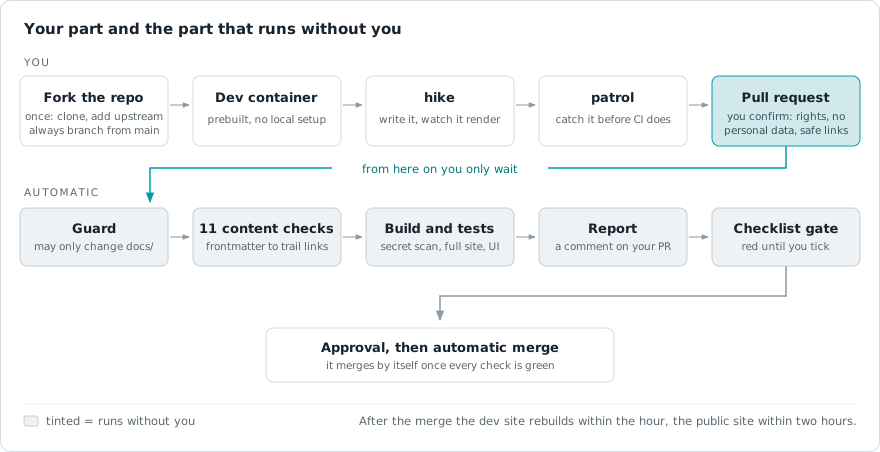
A STACKIT account to log in with. Docker Desktop or podman plus VS Code. One access token. Everything else, from Node to the test browser, already sits inside the prebuilt image.
Contributing to the STACKIT Cloud Framework means writing content, not running an application. The whole docs app ships as a prebuilt dev container image, and your clone of the content repository is mounted into it. This guide takes you from having nothing installed to an open pull request.
Three things, and only the first two touch your machine:
A STACKIT account. It is the identity you log in with, and it onboards you automatically.
A container runtime and an editor. Docker Desktop or podman, plus Visual Studio Code with the Dev Containers extension.
An access token from the Git instance, which you create in a later step and use as your password for both cloning and pulling the image.
You never need access to the application repository. Everything the site needs to build, Node, the docs app, the diagram toolchain and the test browser, is already inside the image.
If you do not have a STACKIT login yet, create one first at accounts.stackit.cloud , then come back to the next step.
Use a personal work address for it, in the form firstname.lastname@company.com. The Git instance builds your username from the part before the @. You cannot change that username later.
If the login works but the Git instance rejects you afterwards, your account is probably not in the STACKIT organization that hosts the instance. Contact Framework Core and we will sort it out.
Log in once via the STACKIT IDP at scf-content.git.onstackit.cloud . That single login does two things:
@, so with a personal address it reads firstname.lastname.Contributing here is public. The site credits people by name in two places: the history timeline on every asset and trail, and the Maintainers block on the pages you are listed for. That is the point of the credit, and you decide which name it is.
Three separate sources feed it:
| Where | Comes from | You change it in |
|---|---|---|
| History timeline | the author of your commits, shown as who and when | git config user.name in your clone |
| Maintainers credit | the Full name of your STACKIT Git profile, mirrored daily once you have declared it | your Git profile |
| The profile panel that opens on hover | your biography, website, address and contribution record | your Git profile, once you have declared them |
Your commit messages never appear on the site. The timeline names the author and the date and nothing else, because a commit message is written for the repository rather than for a reader.
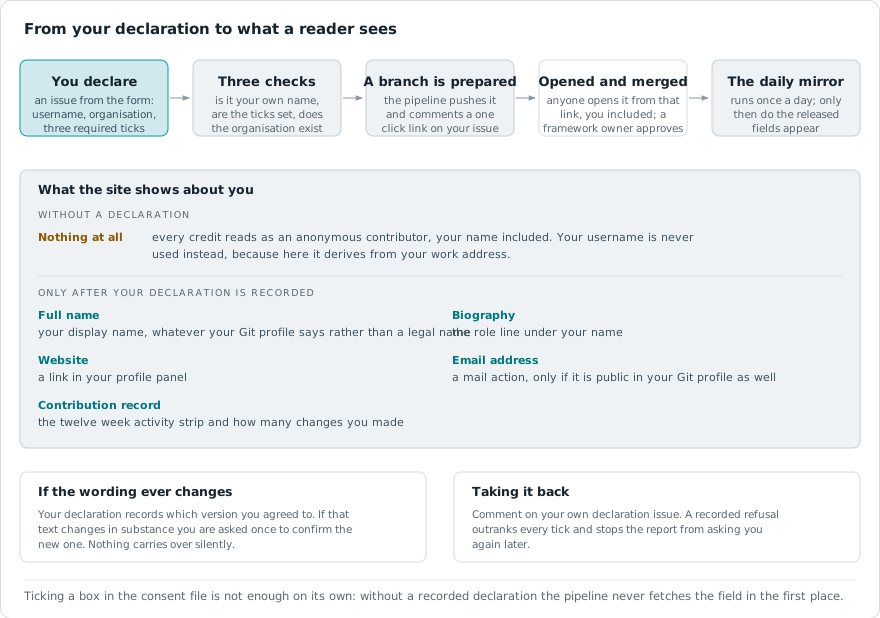
Nothing is shown until you release it yourself, your name included. You do that once, in a declaration: open an issue in the content repository with the Contributor declaration template and tick the details you want shown. Framework Core or your framework owner records the result in settings/contributor-members.json, which is the only place the site reads it from. You cannot edit that file yourself. That is deliberate.
Until your declaration is recorded there, the daily pipeline publishes nothing about you, so a maintainer credit without one reads as an anonymous contributor with no hover panel at all. Your commits still carry your name inside the repository, as they do in any repository, but the website does not repeat it. A detail you did not release is not merely hidden: it is never fetched from your profile and never written down anywhere. Writing role: true next to your name in an asset does nothing either. Only the person a field describes can release it. A content file is not that person.
Two details are worth knowing before you tick the boxes. Your address only appears if you also made it public in your Git profile, because the API hands out a no-reply placeholder otherwise, and that is not a contact. Your contribution record is matched through the address on your commits, so it counts the commits you author under your own account. To change or withdraw any of it later, comment on your own declaration issue.
A pseudonym, a short form or just your initials are all fine in either place. Emptying the Full name works too: after the next mirroring run the maintainers credit shows “Anonymous contributor”, it never falls back to your username. If you would rather not have your private address in the commit history, set a no-reply identity in the same breath:
git config user.name "Your display name"git config user.email "your-username@noreply.scf-content.git.onstackit.cloud"Your address is never shown unless you ask for it: it appears only when a page lists it explicitly, or when you both made it public in your Git profile and the page opts in.
Install these two, in any order:
Nothing else gets installed. No Node, no pnpm, no build tools on your host.
With Docker Desktop you skip this section.
Point VS Code at podman. Open the settings (Ctrl + ,, on the Mac ⌘ + ,), search for dev containers path, change Dev > Containers: Docker Path from docker to podman, then restart VS Code. Without it the extension looks for a docker binary that is not there and the container never starts.
Give the machine memory and disk. The build and the test suite run inside the podman machine and the default one is too small for them. Set it up with room from the start:
podman machine init --memory 8192 --cpus 4 --disk-size 60podman machine startIf your machine already exists, adjust it afterwards:
podman machine stoppodman machine set --memory 8192 --cpus 4podman machine startOn Windows, do all of this inside WSL2 and clone into the Linux file system, for example ~/projects/scf-content.
A clone under /mnt/c/... looks like it works: the container starts, the site builds, the page loads. But file change events do not cross the Windows to Linux boundary reliably, so hot reload never fires and your edits appear to have no effect until you restart the server.
On the Git instance, open Settings, then Applications, then Generate new token. Grant exactly these permissions:
| Permission | Level | Needed for |
|---|---|---|
repository | Read and Write | cloning the content repo, pushing branches |
package | Read | pulling the prebuilt dev container image |
Above the permission list sits a dropdown called Repository and Organization Access. Leave it on All (public, private and limited). On “Public only” the token cannot see the private content repository at all, and cloning as well as the registry login fail with a 403 even though every permission above is set correctly.
Log in with your Git username and the token as the password, then pull the image:
docker login scf-content.git.onstackit.clouddocker image pull scf-content.git.onstackit.cloud/scf-core/scf-system:latestpodman is a drop-in replacement here: podman login and podman image pull take exactly the same arguments.
Pulling the image up front is optional, VS Code pulls it for you on the first container start. Doing it manually just makes the first start faster and shows you early whether the login worked.
The image is multi-arch: the same pull gives Intel and Windows machines the amd64 variant and Apple Silicon Macs the native arm64 variant, automatically. When you pull a newer image later, follow it with Rebuild Container in VS Code, because a plain reopen keeps the cached old container running. Superseded image versions pile up as untagged leftovers, so run docker image prune (or podman image prune) on your machine now and then to clear them out.
The content repository grants read access only, so your fork is the place you push to. Everybody works this way, Framework Core included. Open scf-core/scf-content and press Fork, then clone your copy with your Git username and the token as credentials:
git clone https://scf-content.git.onstackit.cloud/<your-username>/scf-content.gitcd scf-contentgit remote add upstream https://scf-content.git.onstackit.cloud/scf-core/scf-content.gitThe upstream remote is how you pull later changes from the shared repository into your fork.
One thing to know before you branch: your fork copies every branch this repository has on the day you fork it, half-finished ones included. Start new work from upstream/main and from nothing else, which is also why a fork that has fallen behind cannot get in your way. When you do want it up to date, your fork’s page shows a green banner with a button that does it in one click. On our instance that button still carries its untranslated label repo.sync_fork.button, so go by the green banner rather than by the wording. A branch you have kept for weeks wants main merged into it before you open the next pull request.
Open the folder in VS Code. It detects the dev container configuration and offers Reopen in Container, which is also available from the command palette. The first start pulls the image and takes a few minutes; every later start is quick.
Your clone is mounted into the prebuilt app as its content, which is why you can preview the complete site without ever touching the application repository.
You enter the token twice because two different tools remember it in two different places, and knowing where saves you a confusing afternoon later:
git fetch and git push against that host replays it silently.~/.config/containers/auth.json). The two do not share anything, which is why the registry login is its own step.There is no git logout. When you rotate a token, or signed in with the wrong account, git keeps replaying the stored login and never asks again — the fix is to clear the stored entry so the next fetch or push prompts fresh (in the VS Code terminal that prompt appears as an input box at the top of the window, not in the terminal):
printf "protocol=https\nhost=scf-content.git.onstackit.cloud\n\n" | git credential rejectOn Windows you can alternatively open the Credential Manager and remove the git:https://scf-content.git.onstackit.cloud entry there. To see which account macOS currently has stored for the host:
security find-internet-password -s scf-content.git.onstackit.cloud | grep acctYour commit identity is a separate thing entirely: git config user.name and user.email decide how your commits are labelled, the stored login only decides who you authenticate as when pushing.
In the container terminal, run:
hikeThe same thing is available as the VS Code task 🥾 Hike, Start Dev Docs. The site is forwarded to http://localhost:4321 with hot reload, so every save shows up in the browser within a second.
Type help to see the full tool belt:
| Command | What it does |
|---|---|
hike | dev server with hot reload on http://localhost:4321 |
summit | full production build |
panorama | serve the built site |
patrol | build plus the complete UI test suite, the same gate as your PR |
scout | how to update the dev container image |
Almost every failed setup comes down to one of these:
/mnt/c silently breaks hot reload. Work inside WSL2 and clone into the Linux file system.Branch off upstream/main rather than off your own main, then write:
git fetch upstreamgit switch -c content/short-description upstream/mainYour fork’s main falls behind the moment somebody else contributes, and a branch started on top of it drags that gap into your pull request. Fetching first costs a second and takes the question away entirely. When you do want the fork itself tidy, CONTRIBUTING has the commands for that.
For new pages, use the studios instead of copying frontmatter by hand:
http://localhost:4321/studio, writes a contributor profile, an asset, a trail or a framework page. It also loads an existing file and changes only what you edit, so everything you leave alone stays exactly as it was.http://localhost:4321/diagrambuilder, draws a diagram in the SCF design and saves it next to your page.Both run on your local dev server, and the SCF Studio runs on the dev site as well. It writes frontmatter that already satisfies the pipeline’s rules: a real description in the rewarded 120 to 160 character window, a category from the allowed list and at most 10 tags.
For the authoring rules behind the generated files, see the asset integration guide and the trail setup guide.
patrolpatrol reproduces what the pipeline runs: the production build, the UI test suite, and a walkthrough of every asset, trail and profile your branch touched. It takes a few minutes and saves you a review round, because a green patrol almost always means a green pull request.
Push your branch to your fork and open a pull request against main of the shared repository. The description arrives prefilled with three confirmations you have to tick: that you hold the rights to what you contribute, that it carries nobody’s personal data and nothing confidential, and that every link points at an official source. A separate check reads them and stays red until all three are ticked, so keep the prefilled text in place rather than replacing it with your own.
On the files your pull request touches, the pipeline checks:
<LinkCard> or <LinkChip>, and their on-site targets must exist — see the asset integration guideIt then builds the full site, runs the UI tests and posts a report on your pull request. A temporary, password-protected preview site is optional: tick the preview box in the description and your pages go up within fifteen minutes of the checks turning green, follow every push, then disappear when the pull request closes. Nothing depends on it, patrol shows you the same result locally.
A Framework Core reviewer approves and merges. You can also tick the automatic-merge box, then the merge happens on its own within ten minutes of an approval landing on a green pull request. Either way your content goes live with the next site deployment.
Contributing to the STACKIT Cloud Framework means writing content, not running an application. The whole docs app ships as a prebuilt dev container image, and your clone of the content repository is mounted into it. This guide takes you from having nothing installed to an open pull request.
Three things, and only the first two touch your machine:
A STACKIT account. It is the identity you log in with, and it onboards you automatically.
A container runtime and an editor. Docker Desktop or podman, plus Visual Studio Code with the Dev Containers extension.
An access token from the Git instance, which you create in a later step and use as your password for both cloning and pulling the image.
You never need access to the application repository. Everything the site needs to build, Node, the docs app, the diagram toolchain and the test browser, is already inside the image.
If you do not have a STACKIT login yet, create one first at accounts.stackit.cloud , then come back to the next step.
Use a personal work address for it, in the form firstname.lastname@company.com. The Git instance builds your username from the part before the @. You cannot change that username later.
If the login works but the Git instance rejects you afterwards, your account is probably not in the STACKIT organization that hosts the instance. Contact Framework Core and we will sort it out.
Log in once via the STACKIT IDP at scf-content.git.onstackit.cloud . That single login does two things:
@, so with a personal address it reads firstname.lastname.Contributing here is public. The site credits people by name in two places: the history timeline on every asset and trail, and the Maintainers block on the pages you are listed for. That is the point of the credit, and you decide which name it is.
Three separate sources feed it:
| Where | Comes from | You change it in |
|---|---|---|
| History timeline | the author of your commits, shown as who and when | git config user.name in your clone |
| Maintainers credit | the Full name of your STACKIT Git profile, mirrored daily once you have declared it | your Git profile |
| The profile panel that opens on hover | your biography, website, address and contribution record | your Git profile, once you have declared them |
Your commit messages never appear on the site. The timeline names the author and the date and nothing else, because a commit message is written for the repository rather than for a reader.
Nothing is shown until you release it yourself, your name included. You do that once, in a declaration: open an issue in the content repository with the Contributor declaration template and tick the details you want shown. Framework Core or your framework owner records the result in settings/contributor-members.json, which is the only place the site reads it from. You cannot edit that file yourself. That is deliberate.
Until your declaration is recorded there, the daily pipeline publishes nothing about you, so a maintainer credit without one reads as an anonymous contributor with no hover panel at all. Your commits still carry your name inside the repository, as they do in any repository, but the website does not repeat it. A detail you did not release is not merely hidden: it is never fetched from your profile and never written down anywhere. Writing role: true next to your name in an asset does nothing either. Only the person a field describes can release it. A content file is not that person.
Two details are worth knowing before you tick the boxes. Your address only appears if you also made it public in your Git profile, because the API hands out a no-reply placeholder otherwise, and that is not a contact. Your contribution record is matched through the address on your commits, so it counts the commits you author under your own account. To change or withdraw any of it later, comment on your own declaration issue.
A pseudonym, a short form or just your initials are all fine in either place. Emptying the Full name works too: after the next mirroring run the maintainers credit shows “Anonymous contributor”, it never falls back to your username. If you would rather not have your private address in the commit history, set a no-reply identity in the same breath:
git config user.name "Your display name"git config user.email "your-username@noreply.scf-content.git.onstackit.cloud"Your address is never shown unless you ask for it: it appears only when a page lists it explicitly, or when you both made it public in your Git profile and the page opts in.
Install these two, in any order:
Nothing else gets installed. No Node, no pnpm, no build tools on your host.
With Docker Desktop you skip this section.
Point VS Code at podman. Open the settings (Ctrl + ,, on the Mac ⌘ + ,), search for dev containers path, change Dev > Containers: Docker Path from docker to podman, then restart VS Code. Without it the extension looks for a docker binary that is not there and the container never starts.
Give the machine memory and disk. The build and the test suite run inside the podman machine and the default one is too small for them. Set it up with room from the start:
podman machine init --memory 8192 --cpus 4 --disk-size 60podman machine startIf your machine already exists, adjust it afterwards:
podman machine stoppodman machine set --memory 8192 --cpus 4podman machine startOn Windows, do all of this inside WSL2 and clone into the Linux file system, for example ~/projects/scf-content.
A clone under /mnt/c/... looks like it works: the container starts, the site builds, the page loads. But file change events do not cross the Windows to Linux boundary reliably, so hot reload never fires and your edits appear to have no effect until you restart the server.
On the Git instance, open Settings, then Applications, then Generate new token. Grant exactly these permissions:
| Permission | Level | Needed for |
|---|---|---|
repository | Read and Write | cloning the content repo, pushing branches |
package | Read | pulling the prebuilt dev container image |
Above the permission list sits a dropdown called Repository and Organization Access. Leave it on All (public, private and limited). On “Public only” the token cannot see the private content repository at all, and cloning as well as the registry login fail with a 403 even though every permission above is set correctly.
Log in with your Git username and the token as the password, then pull the image:
docker login scf-content.git.onstackit.clouddocker image pull scf-content.git.onstackit.cloud/scf-core/scf-system:latestpodman is a drop-in replacement here: podman login and podman image pull take exactly the same arguments.
Pulling the image up front is optional, VS Code pulls it for you on the first container start. Doing it manually just makes the first start faster and shows you early whether the login worked.
The image is multi-arch: the same pull gives Intel and Windows machines the amd64 variant and Apple Silicon Macs the native arm64 variant, automatically. When you pull a newer image later, follow it with Rebuild Container in VS Code, because a plain reopen keeps the cached old container running. Superseded image versions pile up as untagged leftovers, so run docker image prune (or podman image prune) on your machine now and then to clear them out.
The content repository grants read access only, so your fork is the place you push to. Everybody works this way, Framework Core included. Open scf-core/scf-content and press Fork, then clone your copy with your Git username and the token as credentials:
git clone https://scf-content.git.onstackit.cloud/<your-username>/scf-content.gitcd scf-contentgit remote add upstream https://scf-content.git.onstackit.cloud/scf-core/scf-content.gitThe upstream remote is how you pull later changes from the shared repository into your fork.
One thing to know before you branch: your fork copies every branch this repository has on the day you fork it, half-finished ones included. Start new work from upstream/main and from nothing else, which is also why a fork that has fallen behind cannot get in your way. When you do want it up to date, your fork’s page shows a green banner with a button that does it in one click. On our instance that button still carries its untranslated label repo.sync_fork.button, so go by the green banner rather than by the wording. A branch you have kept for weeks wants main merged into it before you open the next pull request.
Open the folder in VS Code. It detects the dev container configuration and offers Reopen in Container, which is also available from the command palette. The first start pulls the image and takes a few minutes; every later start is quick.
Your clone is mounted into the prebuilt app as its content, which is why you can preview the complete site without ever touching the application repository.
You enter the token twice because two different tools remember it in two different places, and knowing where saves you a confusing afternoon later:
git fetch and git push against that host replays it silently.~/.config/containers/auth.json). The two do not share anything, which is why the registry login is its own step.There is no git logout. When you rotate a token, or signed in with the wrong account, git keeps replaying the stored login and never asks again — the fix is to clear the stored entry so the next fetch or push prompts fresh (in the VS Code terminal that prompt appears as an input box at the top of the window, not in the terminal):
printf "protocol=https\nhost=scf-content.git.onstackit.cloud\n\n" | git credential rejectOn Windows you can alternatively open the Credential Manager and remove the git:https://scf-content.git.onstackit.cloud entry there. To see which account macOS currently has stored for the host:
security find-internet-password -s scf-content.git.onstackit.cloud | grep acctYour commit identity is a separate thing entirely: git config user.name and user.email decide how your commits are labelled, the stored login only decides who you authenticate as when pushing.
In the container terminal, run:
hikeThe same thing is available as the VS Code task 🥾 Hike, Start Dev Docs. The site is forwarded to http://localhost:4321 with hot reload, so every save shows up in the browser within a second.
Type help to see the full tool belt:
| Command | What it does |
|---|---|
hike | dev server with hot reload on http://localhost:4321 |
summit | full production build |
panorama | serve the built site |
patrol | build plus the complete UI test suite, the same gate as your PR |
scout | how to update the dev container image |
Almost every failed setup comes down to one of these:
/mnt/c silently breaks hot reload. Work inside WSL2 and clone into the Linux file system.Branch off upstream/main rather than off your own main, then write:
git fetch upstreamgit switch -c content/short-description upstream/mainYour fork’s main falls behind the moment somebody else contributes, and a branch started on top of it drags that gap into your pull request. Fetching first costs a second and takes the question away entirely. When you do want the fork itself tidy, CONTRIBUTING has the commands for that.
For new pages, use the studios instead of copying frontmatter by hand:
http://localhost:4321/studio, writes a contributor profile, an asset, a trail or a framework page. It also loads an existing file and changes only what you edit, so everything you leave alone stays exactly as it was.http://localhost:4321/diagrambuilder, draws a diagram in the SCF design and saves it next to your page.Both run on your local dev server, and the SCF Studio runs on the dev site as well. It writes frontmatter that already satisfies the pipeline’s rules: a real description in the rewarded 120 to 160 character window, a category from the allowed list and at most 10 tags.
For the authoring rules behind the generated files, see the asset integration guide and the trail setup guide.
patrolpatrol reproduces what the pipeline runs: the production build, the UI test suite, and a walkthrough of every asset, trail and profile your branch touched. It takes a few minutes and saves you a review round, because a green patrol almost always means a green pull request.
Push your branch to your fork and open a pull request against main of the shared repository. The description arrives prefilled with three confirmations you have to tick: that you hold the rights to what you contribute, that it carries nobody’s personal data and nothing confidential, and that every link points at an official source. A separate check reads them and stays red until all three are ticked, so keep the prefilled text in place rather than replacing it with your own.
On the files your pull request touches, the pipeline checks:
<LinkCard> or <LinkChip>, and their on-site targets must exist — see the asset integration guideIt then builds the full site, runs the UI tests and posts a report on your pull request. A temporary, password-protected preview site is optional: tick the preview box in the description and your pages go up within fifteen minutes of the checks turning green, follow every push, then disappear when the pull request closes. Nothing depends on it, patrol shows you the same result locally.
A Framework Core reviewer approves and merges. You can also tick the automatic-merge box, then the merge happens on its own within ten minutes of an approval landing on a green pull request. Either way your content goes live with the next site deployment.
Log in once through the STACKIT IDP. That creates your Git user, and a pipeline adds you to the contributors team within 15 minutes. Nobody has to invite you.
Contributing to the STACKIT Cloud Framework means writing content, not running an application. The whole docs app ships as a prebuilt dev container image, and your clone of the content repository is mounted into it. This guide takes you from having nothing installed to an open pull request.
Three things, and only the first two touch your machine:
A STACKIT account. It is the identity you log in with, and it onboards you automatically.
A container runtime and an editor. Docker Desktop or podman, plus Visual Studio Code with the Dev Containers extension.
An access token from the Git instance, which you create in a later step and use as your password for both cloning and pulling the image.
You never need access to the application repository. Everything the site needs to build, Node, the docs app, the diagram toolchain and the test browser, is already inside the image.
If you do not have a STACKIT login yet, create one first at accounts.stackit.cloud , then come back to the next step.
Use a personal work address for it, in the form firstname.lastname@company.com. The Git instance builds your username from the part before the @. You cannot change that username later.
If the login works but the Git instance rejects you afterwards, your account is probably not in the STACKIT organization that hosts the instance. Contact Framework Core and we will sort it out.
Log in once via the STACKIT IDP at scf-content.git.onstackit.cloud . That single login does two things:
@, so with a personal address it reads firstname.lastname.Contributing here is public. The site credits people by name in two places: the history timeline on every asset and trail, and the Maintainers block on the pages you are listed for. That is the point of the credit, and you decide which name it is.
Three separate sources feed it:
| Where | Comes from | You change it in |
|---|---|---|
| History timeline | the author of your commits, shown as who and when | git config user.name in your clone |
| Maintainers credit | the Full name of your STACKIT Git profile, mirrored daily once you have declared it | your Git profile |
| The profile panel that opens on hover | your biography, website, address and contribution record | your Git profile, once you have declared them |
Your commit messages never appear on the site. The timeline names the author and the date and nothing else, because a commit message is written for the repository rather than for a reader.
Nothing is shown until you release it yourself, your name included. You do that once, in a declaration: open an issue in the content repository with the Contributor declaration template and tick the details you want shown. Framework Core or your framework owner records the result in settings/contributor-members.json, which is the only place the site reads it from. You cannot edit that file yourself. That is deliberate.
Until your declaration is recorded there, the daily pipeline publishes nothing about you, so a maintainer credit without one reads as an anonymous contributor with no hover panel at all. Your commits still carry your name inside the repository, as they do in any repository, but the website does not repeat it. A detail you did not release is not merely hidden: it is never fetched from your profile and never written down anywhere. Writing role: true next to your name in an asset does nothing either. Only the person a field describes can release it. A content file is not that person.
Two details are worth knowing before you tick the boxes. Your address only appears if you also made it public in your Git profile, because the API hands out a no-reply placeholder otherwise, and that is not a contact. Your contribution record is matched through the address on your commits, so it counts the commits you author under your own account. To change or withdraw any of it later, comment on your own declaration issue.
A pseudonym, a short form or just your initials are all fine in either place. Emptying the Full name works too: after the next mirroring run the maintainers credit shows “Anonymous contributor”, it never falls back to your username. If you would rather not have your private address in the commit history, set a no-reply identity in the same breath:
git config user.name "Your display name"git config user.email "your-username@noreply.scf-content.git.onstackit.cloud"Your address is never shown unless you ask for it: it appears only when a page lists it explicitly, or when you both made it public in your Git profile and the page opts in.
Install these two, in any order:
Nothing else gets installed. No Node, no pnpm, no build tools on your host.
With Docker Desktop you skip this section.
Point VS Code at podman. Open the settings (Ctrl + ,, on the Mac ⌘ + ,), search for dev containers path, change Dev > Containers: Docker Path from docker to podman, then restart VS Code. Without it the extension looks for a docker binary that is not there and the container never starts.
Give the machine memory and disk. The build and the test suite run inside the podman machine and the default one is too small for them. Set it up with room from the start:
podman machine init --memory 8192 --cpus 4 --disk-size 60podman machine startIf your machine already exists, adjust it afterwards:
podman machine stoppodman machine set --memory 8192 --cpus 4podman machine startOn Windows, do all of this inside WSL2 and clone into the Linux file system, for example ~/projects/scf-content.
A clone under /mnt/c/... looks like it works: the container starts, the site builds, the page loads. But file change events do not cross the Windows to Linux boundary reliably, so hot reload never fires and your edits appear to have no effect until you restart the server.
On the Git instance, open Settings, then Applications, then Generate new token. Grant exactly these permissions:
| Permission | Level | Needed for |
|---|---|---|
repository | Read and Write | cloning the content repo, pushing branches |
package | Read | pulling the prebuilt dev container image |
Above the permission list sits a dropdown called Repository and Organization Access. Leave it on All (public, private and limited). On “Public only” the token cannot see the private content repository at all, and cloning as well as the registry login fail with a 403 even though every permission above is set correctly.
Log in with your Git username and the token as the password, then pull the image:
docker login scf-content.git.onstackit.clouddocker image pull scf-content.git.onstackit.cloud/scf-core/scf-system:latestpodman is a drop-in replacement here: podman login and podman image pull take exactly the same arguments.
Pulling the image up front is optional, VS Code pulls it for you on the first container start. Doing it manually just makes the first start faster and shows you early whether the login worked.
The image is multi-arch: the same pull gives Intel and Windows machines the amd64 variant and Apple Silicon Macs the native arm64 variant, automatically. When you pull a newer image later, follow it with Rebuild Container in VS Code, because a plain reopen keeps the cached old container running. Superseded image versions pile up as untagged leftovers, so run docker image prune (or podman image prune) on your machine now and then to clear them out.
The content repository grants read access only, so your fork is the place you push to. Everybody works this way, Framework Core included. Open scf-core/scf-content and press Fork, then clone your copy with your Git username and the token as credentials:
git clone https://scf-content.git.onstackit.cloud/<your-username>/scf-content.gitcd scf-contentgit remote add upstream https://scf-content.git.onstackit.cloud/scf-core/scf-content.gitThe upstream remote is how you pull later changes from the shared repository into your fork.
One thing to know before you branch: your fork copies every branch this repository has on the day you fork it, half-finished ones included. Start new work from upstream/main and from nothing else, which is also why a fork that has fallen behind cannot get in your way. When you do want it up to date, your fork’s page shows a green banner with a button that does it in one click. On our instance that button still carries its untranslated label repo.sync_fork.button, so go by the green banner rather than by the wording. A branch you have kept for weeks wants main merged into it before you open the next pull request.
Open the folder in VS Code. It detects the dev container configuration and offers Reopen in Container, which is also available from the command palette. The first start pulls the image and takes a few minutes; every later start is quick.
Your clone is mounted into the prebuilt app as its content, which is why you can preview the complete site without ever touching the application repository.
You enter the token twice because two different tools remember it in two different places, and knowing where saves you a confusing afternoon later:
git fetch and git push against that host replays it silently.~/.config/containers/auth.json). The two do not share anything, which is why the registry login is its own step.There is no git logout. When you rotate a token, or signed in with the wrong account, git keeps replaying the stored login and never asks again — the fix is to clear the stored entry so the next fetch or push prompts fresh (in the VS Code terminal that prompt appears as an input box at the top of the window, not in the terminal):
printf "protocol=https\nhost=scf-content.git.onstackit.cloud\n\n" | git credential rejectOn Windows you can alternatively open the Credential Manager and remove the git:https://scf-content.git.onstackit.cloud entry there. To see which account macOS currently has stored for the host:
security find-internet-password -s scf-content.git.onstackit.cloud | grep acctYour commit identity is a separate thing entirely: git config user.name and user.email decide how your commits are labelled, the stored login only decides who you authenticate as when pushing.
In the container terminal, run:
hikeThe same thing is available as the VS Code task 🥾 Hike, Start Dev Docs. The site is forwarded to http://localhost:4321 with hot reload, so every save shows up in the browser within a second.
Type help to see the full tool belt:
| Command | What it does |
|---|---|
hike | dev server with hot reload on http://localhost:4321 |
summit | full production build |
panorama | serve the built site |
patrol | build plus the complete UI test suite, the same gate as your PR |
scout | how to update the dev container image |
Almost every failed setup comes down to one of these:
/mnt/c silently breaks hot reload. Work inside WSL2 and clone into the Linux file system.Branch off upstream/main rather than off your own main, then write:
git fetch upstreamgit switch -c content/short-description upstream/mainYour fork’s main falls behind the moment somebody else contributes, and a branch started on top of it drags that gap into your pull request. Fetching first costs a second and takes the question away entirely. When you do want the fork itself tidy, CONTRIBUTING has the commands for that.
For new pages, use the studios instead of copying frontmatter by hand:
http://localhost:4321/studio, writes a contributor profile, an asset, a trail or a framework page. It also loads an existing file and changes only what you edit, so everything you leave alone stays exactly as it was.http://localhost:4321/diagrambuilder, draws a diagram in the SCF design and saves it next to your page.Both run on your local dev server, and the SCF Studio runs on the dev site as well. It writes frontmatter that already satisfies the pipeline’s rules: a real description in the rewarded 120 to 160 character window, a category from the allowed list and at most 10 tags.
For the authoring rules behind the generated files, see the asset integration guide and the trail setup guide.
patrolpatrol reproduces what the pipeline runs: the production build, the UI test suite, and a walkthrough of every asset, trail and profile your branch touched. It takes a few minutes and saves you a review round, because a green patrol almost always means a green pull request.
Push your branch to your fork and open a pull request against main of the shared repository. The description arrives prefilled with three confirmations you have to tick: that you hold the rights to what you contribute, that it carries nobody’s personal data and nothing confidential, and that every link points at an official source. A separate check reads them and stays red until all three are ticked, so keep the prefilled text in place rather than replacing it with your own.
On the files your pull request touches, the pipeline checks:
<LinkCard> or <LinkChip>, and their on-site targets must exist — see the asset integration guideIt then builds the full site, runs the UI tests and posts a report on your pull request. A temporary, password-protected preview site is optional: tick the preview box in the description and your pages go up within fifteen minutes of the checks turning green, follow every push, then disappear when the pull request closes. Nothing depends on it, patrol shows you the same result locally.
A Framework Core reviewer approves and merges. You can also tick the automatic-merge box, then the merge happens on its own within ten minutes of an approval landing on a green pull request. Either way your content goes live with the next site deployment.
Contributing here is public. Your name appears once you declare it in a short form. Until then the credit reads Name not public. Pseudonyms and initials work too.
Contributing to the STACKIT Cloud Framework means writing content, not running an application. The whole docs app ships as a prebuilt dev container image, and your clone of the content repository is mounted into it. This guide takes you from having nothing installed to an open pull request.
Three things, and only the first two touch your machine:
A STACKIT account. It is the identity you log in with, and it onboards you automatically.
A container runtime and an editor. Docker Desktop or podman, plus Visual Studio Code with the Dev Containers extension.
An access token from the Git instance, which you create in a later step and use as your password for both cloning and pulling the image.
You never need access to the application repository. Everything the site needs to build, Node, the docs app, the diagram toolchain and the test browser, is already inside the image.
If you do not have a STACKIT login yet, create one first at accounts.stackit.cloud , then come back to the next step.
Use a personal work address for it, in the form firstname.lastname@company.com. The Git instance builds your username from the part before the @. You cannot change that username later.
If the login works but the Git instance rejects you afterwards, your account is probably not in the STACKIT organization that hosts the instance. Contact Framework Core and we will sort it out.
Log in once via the STACKIT IDP at scf-content.git.onstackit.cloud . That single login does two things:
@, so with a personal address it reads firstname.lastname.Contributing here is public. The site credits people by name in two places: the history timeline on every asset and trail, and the Maintainers block on the pages you are listed for. That is the point of the credit, and you decide which name it is.
Three separate sources feed it:
| Where | Comes from | You change it in |
|---|---|---|
| History timeline | the author of your commits, shown as who and when | git config user.name in your clone |
| Maintainers credit | the Full name of your STACKIT Git profile, mirrored daily once you have declared it | your Git profile |
| The profile panel that opens on hover | your biography, website, address and contribution record | your Git profile, once you have declared them |
Your commit messages never appear on the site. The timeline names the author and the date and nothing else, because a commit message is written for the repository rather than for a reader.
Nothing is shown until you release it yourself, your name included. You do that once, in a declaration: open an issue in the content repository with the Contributor declaration template and tick the details you want shown. Framework Core or your framework owner records the result in settings/contributor-members.json, which is the only place the site reads it from. You cannot edit that file yourself. That is deliberate.
Until your declaration is recorded there, the daily pipeline publishes nothing about you, so a maintainer credit without one reads as an anonymous contributor with no hover panel at all. Your commits still carry your name inside the repository, as they do in any repository, but the website does not repeat it. A detail you did not release is not merely hidden: it is never fetched from your profile and never written down anywhere. Writing role: true next to your name in an asset does nothing either. Only the person a field describes can release it. A content file is not that person.
Two details are worth knowing before you tick the boxes. Your address only appears if you also made it public in your Git profile, because the API hands out a no-reply placeholder otherwise, and that is not a contact. Your contribution record is matched through the address on your commits, so it counts the commits you author under your own account. To change or withdraw any of it later, comment on your own declaration issue.
A pseudonym, a short form or just your initials are all fine in either place. Emptying the Full name works too: after the next mirroring run the maintainers credit shows “Anonymous contributor”, it never falls back to your username. If you would rather not have your private address in the commit history, set a no-reply identity in the same breath:
git config user.name "Your display name"git config user.email "your-username@noreply.scf-content.git.onstackit.cloud"Your address is never shown unless you ask for it: it appears only when a page lists it explicitly, or when you both made it public in your Git profile and the page opts in.
Install these two, in any order:
Nothing else gets installed. No Node, no pnpm, no build tools on your host.
With Docker Desktop you skip this section.
Point VS Code at podman. Open the settings (Ctrl + ,, on the Mac ⌘ + ,), search for dev containers path, change Dev > Containers: Docker Path from docker to podman, then restart VS Code. Without it the extension looks for a docker binary that is not there and the container never starts.
Give the machine memory and disk. The build and the test suite run inside the podman machine and the default one is too small for them. Set it up with room from the start:
podman machine init --memory 8192 --cpus 4 --disk-size 60podman machine startIf your machine already exists, adjust it afterwards:
podman machine stoppodman machine set --memory 8192 --cpus 4podman machine startOn Windows, do all of this inside WSL2 and clone into the Linux file system, for example ~/projects/scf-content.
A clone under /mnt/c/... looks like it works: the container starts, the site builds, the page loads. But file change events do not cross the Windows to Linux boundary reliably, so hot reload never fires and your edits appear to have no effect until you restart the server.
On the Git instance, open Settings, then Applications, then Generate new token. Grant exactly these permissions:
| Permission | Level | Needed for |
|---|---|---|
repository | Read and Write | cloning the content repo, pushing branches |
package | Read | pulling the prebuilt dev container image |
Above the permission list sits a dropdown called Repository and Organization Access. Leave it on All (public, private and limited). On “Public only” the token cannot see the private content repository at all, and cloning as well as the registry login fail with a 403 even though every permission above is set correctly.
Log in with your Git username and the token as the password, then pull the image:
docker login scf-content.git.onstackit.clouddocker image pull scf-content.git.onstackit.cloud/scf-core/scf-system:latestpodman is a drop-in replacement here: podman login and podman image pull take exactly the same arguments.
Pulling the image up front is optional, VS Code pulls it for you on the first container start. Doing it manually just makes the first start faster and shows you early whether the login worked.
The image is multi-arch: the same pull gives Intel and Windows machines the amd64 variant and Apple Silicon Macs the native arm64 variant, automatically. When you pull a newer image later, follow it with Rebuild Container in VS Code, because a plain reopen keeps the cached old container running. Superseded image versions pile up as untagged leftovers, so run docker image prune (or podman image prune) on your machine now and then to clear them out.
The content repository grants read access only, so your fork is the place you push to. Everybody works this way, Framework Core included. Open scf-core/scf-content and press Fork, then clone your copy with your Git username and the token as credentials:
git clone https://scf-content.git.onstackit.cloud/<your-username>/scf-content.gitcd scf-contentgit remote add upstream https://scf-content.git.onstackit.cloud/scf-core/scf-content.gitThe upstream remote is how you pull later changes from the shared repository into your fork.
One thing to know before you branch: your fork copies every branch this repository has on the day you fork it, half-finished ones included. Start new work from upstream/main and from nothing else, which is also why a fork that has fallen behind cannot get in your way. When you do want it up to date, your fork’s page shows a green banner with a button that does it in one click. On our instance that button still carries its untranslated label repo.sync_fork.button, so go by the green banner rather than by the wording. A branch you have kept for weeks wants main merged into it before you open the next pull request.
Open the folder in VS Code. It detects the dev container configuration and offers Reopen in Container, which is also available from the command palette. The first start pulls the image and takes a few minutes; every later start is quick.
Your clone is mounted into the prebuilt app as its content, which is why you can preview the complete site without ever touching the application repository.
You enter the token twice because two different tools remember it in two different places, and knowing where saves you a confusing afternoon later:
git fetch and git push against that host replays it silently.~/.config/containers/auth.json). The two do not share anything, which is why the registry login is its own step.There is no git logout. When you rotate a token, or signed in with the wrong account, git keeps replaying the stored login and never asks again — the fix is to clear the stored entry so the next fetch or push prompts fresh (in the VS Code terminal that prompt appears as an input box at the top of the window, not in the terminal):
printf "protocol=https\nhost=scf-content.git.onstackit.cloud\n\n" | git credential rejectOn Windows you can alternatively open the Credential Manager and remove the git:https://scf-content.git.onstackit.cloud entry there. To see which account macOS currently has stored for the host:
security find-internet-password -s scf-content.git.onstackit.cloud | grep acctYour commit identity is a separate thing entirely: git config user.name and user.email decide how your commits are labelled, the stored login only decides who you authenticate as when pushing.
In the container terminal, run:
hikeThe same thing is available as the VS Code task 🥾 Hike, Start Dev Docs. The site is forwarded to http://localhost:4321 with hot reload, so every save shows up in the browser within a second.
Type help to see the full tool belt:
| Command | What it does |
|---|---|
hike | dev server with hot reload on http://localhost:4321 |
summit | full production build |
panorama | serve the built site |
patrol | build plus the complete UI test suite, the same gate as your PR |
scout | how to update the dev container image |
Almost every failed setup comes down to one of these:
/mnt/c silently breaks hot reload. Work inside WSL2 and clone into the Linux file system.Branch off upstream/main rather than off your own main, then write:
git fetch upstreamgit switch -c content/short-description upstream/mainYour fork’s main falls behind the moment somebody else contributes, and a branch started on top of it drags that gap into your pull request. Fetching first costs a second and takes the question away entirely. When you do want the fork itself tidy, CONTRIBUTING has the commands for that.
For new pages, use the studios instead of copying frontmatter by hand:
http://localhost:4321/studio, writes a contributor profile, an asset, a trail or a framework page. It also loads an existing file and changes only what you edit, so everything you leave alone stays exactly as it was.http://localhost:4321/diagrambuilder, draws a diagram in the SCF design and saves it next to your page.Both run on your local dev server, and the SCF Studio runs on the dev site as well. It writes frontmatter that already satisfies the pipeline’s rules: a real description in the rewarded 120 to 160 character window, a category from the allowed list and at most 10 tags.
For the authoring rules behind the generated files, see the asset integration guide and the trail setup guide.
patrolpatrol reproduces what the pipeline runs: the production build, the UI test suite, and a walkthrough of every asset, trail and profile your branch touched. It takes a few minutes and saves you a review round, because a green patrol almost always means a green pull request.
Push your branch to your fork and open a pull request against main of the shared repository. The description arrives prefilled with three confirmations you have to tick: that you hold the rights to what you contribute, that it carries nobody’s personal data and nothing confidential, and that every link points at an official source. A separate check reads them and stays red until all three are ticked, so keep the prefilled text in place rather than replacing it with your own.
On the files your pull request touches, the pipeline checks:
<LinkCard> or <LinkChip>, and their on-site targets must exist — see the asset integration guideIt then builds the full site, runs the UI tests and posts a report on your pull request. A temporary, password-protected preview site is optional: tick the preview box in the description and your pages go up within fifteen minutes of the checks turning green, follow every push, then disappear when the pull request closes. Nothing depends on it, patrol shows you the same result locally.
A Framework Core reviewer approves and merges. You can also tick the automatic-merge box, then the merge happens on its own within ten minutes of an approval landing on a green pull request. Either way your content goes live with the next site deployment.
STACKIT
The sovereign European cloud provider behind the framework, delivering IaaS and PaaS from German and Austrian data centers with full digital independence.
Contributing to the STACKIT Cloud Framework means writing content, not running an application. The whole docs app ships as a prebuilt dev container image, and your clone of the content repository is mounted into it. This guide takes you from having nothing installed to an open pull request.
Three things, and only the first two touch your machine:
A STACKIT account. It is the identity you log in with, and it onboards you automatically.
A container runtime and an editor. Docker Desktop or podman, plus Visual Studio Code with the Dev Containers extension.
An access token from the Git instance, which you create in a later step and use as your password for both cloning and pulling the image.
You never need access to the application repository. Everything the site needs to build, Node, the docs app, the diagram toolchain and the test browser, is already inside the image.
If you do not have a STACKIT login yet, create one first at accounts.stackit.cloud , then come back to the next step.
Use a personal work address for it, in the form firstname.lastname@company.com. The Git instance builds your username from the part before the @. You cannot change that username later.
If the login works but the Git instance rejects you afterwards, your account is probably not in the STACKIT organization that hosts the instance. Contact Framework Core and we will sort it out.
Log in once via the STACKIT IDP at scf-content.git.onstackit.cloud . That single login does two things:
@, so with a personal address it reads firstname.lastname.Contributing here is public. The site credits people by name in two places: the history timeline on every asset and trail, and the Maintainers block on the pages you are listed for. That is the point of the credit, and you decide which name it is.
Three separate sources feed it:
| Where | Comes from | You change it in |
|---|---|---|
| History timeline | the author of your commits, shown as who and when | git config user.name in your clone |
| Maintainers credit | the Full name of your STACKIT Git profile, mirrored daily once you have declared it | your Git profile |
| The profile panel that opens on hover | your biography, website, address and contribution record | your Git profile, once you have declared them |
Your commit messages never appear on the site. The timeline names the author and the date and nothing else, because a commit message is written for the repository rather than for a reader.
Nothing is shown until you release it yourself, your name included. You do that once, in a declaration: open an issue in the content repository with the Contributor declaration template and tick the details you want shown. Framework Core or your framework owner records the result in settings/contributor-members.json, which is the only place the site reads it from. You cannot edit that file yourself. That is deliberate.
Until your declaration is recorded there, the daily pipeline publishes nothing about you, so a maintainer credit without one reads as an anonymous contributor with no hover panel at all. Your commits still carry your name inside the repository, as they do in any repository, but the website does not repeat it. A detail you did not release is not merely hidden: it is never fetched from your profile and never written down anywhere. Writing role: true next to your name in an asset does nothing either. Only the person a field describes can release it. A content file is not that person.
Two details are worth knowing before you tick the boxes. Your address only appears if you also made it public in your Git profile, because the API hands out a no-reply placeholder otherwise, and that is not a contact. Your contribution record is matched through the address on your commits, so it counts the commits you author under your own account. To change or withdraw any of it later, comment on your own declaration issue.
A pseudonym, a short form or just your initials are all fine in either place. Emptying the Full name works too: after the next mirroring run the maintainers credit shows “Anonymous contributor”, it never falls back to your username. If you would rather not have your private address in the commit history, set a no-reply identity in the same breath:
git config user.name "Your display name"git config user.email "your-username@noreply.scf-content.git.onstackit.cloud"Your address is never shown unless you ask for it: it appears only when a page lists it explicitly, or when you both made it public in your Git profile and the page opts in.
Install these two, in any order:
Nothing else gets installed. No Node, no pnpm, no build tools on your host.
With Docker Desktop you skip this section.
Point VS Code at podman. Open the settings (Ctrl + ,, on the Mac ⌘ + ,), search for dev containers path, change Dev > Containers: Docker Path from docker to podman, then restart VS Code. Without it the extension looks for a docker binary that is not there and the container never starts.
Give the machine memory and disk. The build and the test suite run inside the podman machine and the default one is too small for them. Set it up with room from the start:
podman machine init --memory 8192 --cpus 4 --disk-size 60podman machine startIf your machine already exists, adjust it afterwards:
podman machine stoppodman machine set --memory 8192 --cpus 4podman machine startOn Windows, do all of this inside WSL2 and clone into the Linux file system, for example ~/projects/scf-content.
A clone under /mnt/c/... looks like it works: the container starts, the site builds, the page loads. But file change events do not cross the Windows to Linux boundary reliably, so hot reload never fires and your edits appear to have no effect until you restart the server.
On the Git instance, open Settings, then Applications, then Generate new token. Grant exactly these permissions:
| Permission | Level | Needed for |
|---|---|---|
repository | Read and Write | cloning the content repo, pushing branches |
package | Read | pulling the prebuilt dev container image |
Above the permission list sits a dropdown called Repository and Organization Access. Leave it on All (public, private and limited). On “Public only” the token cannot see the private content repository at all, and cloning as well as the registry login fail with a 403 even though every permission above is set correctly.
Log in with your Git username and the token as the password, then pull the image:
docker login scf-content.git.onstackit.clouddocker image pull scf-content.git.onstackit.cloud/scf-core/scf-system:latestpodman is a drop-in replacement here: podman login and podman image pull take exactly the same arguments.
Pulling the image up front is optional, VS Code pulls it for you on the first container start. Doing it manually just makes the first start faster and shows you early whether the login worked.
The image is multi-arch: the same pull gives Intel and Windows machines the amd64 variant and Apple Silicon Macs the native arm64 variant, automatically. When you pull a newer image later, follow it with Rebuild Container in VS Code, because a plain reopen keeps the cached old container running. Superseded image versions pile up as untagged leftovers, so run docker image prune (or podman image prune) on your machine now and then to clear them out.
The content repository grants read access only, so your fork is the place you push to. Everybody works this way, Framework Core included. Open scf-core/scf-content and press Fork, then clone your copy with your Git username and the token as credentials:
git clone https://scf-content.git.onstackit.cloud/<your-username>/scf-content.gitcd scf-contentgit remote add upstream https://scf-content.git.onstackit.cloud/scf-core/scf-content.gitThe upstream remote is how you pull later changes from the shared repository into your fork.
One thing to know before you branch: your fork copies every branch this repository has on the day you fork it, half-finished ones included. Start new work from upstream/main and from nothing else, which is also why a fork that has fallen behind cannot get in your way. When you do want it up to date, your fork’s page shows a green banner with a button that does it in one click. On our instance that button still carries its untranslated label repo.sync_fork.button, so go by the green banner rather than by the wording. A branch you have kept for weeks wants main merged into it before you open the next pull request.
Open the folder in VS Code. It detects the dev container configuration and offers Reopen in Container, which is also available from the command palette. The first start pulls the image and takes a few minutes; every later start is quick.
Your clone is mounted into the prebuilt app as its content, which is why you can preview the complete site without ever touching the application repository.
You enter the token twice because two different tools remember it in two different places, and knowing where saves you a confusing afternoon later:
git fetch and git push against that host replays it silently.~/.config/containers/auth.json). The two do not share anything, which is why the registry login is its own step.There is no git logout. When you rotate a token, or signed in with the wrong account, git keeps replaying the stored login and never asks again — the fix is to clear the stored entry so the next fetch or push prompts fresh (in the VS Code terminal that prompt appears as an input box at the top of the window, not in the terminal):
printf "protocol=https\nhost=scf-content.git.onstackit.cloud\n\n" | git credential rejectOn Windows you can alternatively open the Credential Manager and remove the git:https://scf-content.git.onstackit.cloud entry there. To see which account macOS currently has stored for the host:
security find-internet-password -s scf-content.git.onstackit.cloud | grep acctYour commit identity is a separate thing entirely: git config user.name and user.email decide how your commits are labelled, the stored login only decides who you authenticate as when pushing.
In the container terminal, run:
hikeThe same thing is available as the VS Code task 🥾 Hike, Start Dev Docs. The site is forwarded to http://localhost:4321 with hot reload, so every save shows up in the browser within a second.
Type help to see the full tool belt:
| Command | What it does |
|---|---|
hike | dev server with hot reload on http://localhost:4321 |
summit | full production build |
panorama | serve the built site |
patrol | build plus the complete UI test suite, the same gate as your PR |
scout | how to update the dev container image |
Almost every failed setup comes down to one of these:
/mnt/c silently breaks hot reload. Work inside WSL2 and clone into the Linux file system.Branch off upstream/main rather than off your own main, then write:
git fetch upstreamgit switch -c content/short-description upstream/mainYour fork’s main falls behind the moment somebody else contributes, and a branch started on top of it drags that gap into your pull request. Fetching first costs a second and takes the question away entirely. When you do want the fork itself tidy, CONTRIBUTING has the commands for that.
For new pages, use the studios instead of copying frontmatter by hand:
http://localhost:4321/studio, writes a contributor profile, an asset, a trail or a framework page. It also loads an existing file and changes only what you edit, so everything you leave alone stays exactly as it was.http://localhost:4321/diagrambuilder, draws a diagram in the SCF design and saves it next to your page.Both run on your local dev server, and the SCF Studio runs on the dev site as well. It writes frontmatter that already satisfies the pipeline’s rules: a real description in the rewarded 120 to 160 character window, a category from the allowed list and at most 10 tags.
For the authoring rules behind the generated files, see the asset integration guide and the trail setup guide.
patrolpatrol reproduces what the pipeline runs: the production build, the UI test suite, and a walkthrough of every asset, trail and profile your branch touched. It takes a few minutes and saves you a review round, because a green patrol almost always means a green pull request.
Push your branch to your fork and open a pull request against main of the shared repository. The description arrives prefilled with three confirmations you have to tick: that you hold the rights to what you contribute, that it carries nobody’s personal data and nothing confidential, and that every link points at an official source. A separate check reads them and stays red until all three are ticked, so keep the prefilled text in place rather than replacing it with your own.
On the files your pull request touches, the pipeline checks:
<LinkCard> or <LinkChip>, and their on-site targets must exist — see the asset integration guideIt then builds the full site, runs the UI tests and posts a report on your pull request. A temporary, password-protected preview site is optional: tick the preview box in the description and your pages go up within fifteen minutes of the checks turning green, follow every push, then disappear when the pull request closes. Nothing depends on it, patrol shows you the same result locally.
A Framework Core reviewer approves and merges. You can also tick the automatic-merge box, then the merge happens on its own within ten minutes of an approval landing on a green pull request. Either way your content goes live with the next site deployment.
STACKIT
The sovereign European cloud provider behind the framework, delivering IaaS and PaaS from German and Austrian data centers with full digital independence.
Contributing to the STACKIT Cloud Framework means writing content, not running an application. The whole docs app ships as a prebuilt dev container image, and your clone of the content repository is mounted into it. This guide takes you from having nothing installed to an open pull request.
Three things, and only the first two touch your machine:
A STACKIT account. It is the identity you log in with, and it onboards you automatically.
A container runtime and an editor. Docker Desktop or podman, plus Visual Studio Code with the Dev Containers extension.
An access token from the Git instance, which you create in a later step and use as your password for both cloning and pulling the image.
You never need access to the application repository. Everything the site needs to build, Node, the docs app, the diagram toolchain and the test browser, is already inside the image.
If you do not have a STACKIT login yet, create one first at accounts.stackit.cloud , then come back to the next step.
Use a personal work address for it, in the form firstname.lastname@company.com. The Git instance builds your username from the part before the @. You cannot change that username later.
If the login works but the Git instance rejects you afterwards, your account is probably not in the STACKIT organization that hosts the instance. Contact Framework Core and we will sort it out.
Log in once via the STACKIT IDP at scf-content.git.onstackit.cloud . That single login does two things:
@, so with a personal address it reads firstname.lastname.Contributing here is public. The site credits people by name in two places: the history timeline on every asset and trail, and the Maintainers block on the pages you are listed for. That is the point of the credit, and you decide which name it is.
Three separate sources feed it:
| Where | Comes from | You change it in |
|---|---|---|
| History timeline | the author of your commits, shown as who and when | git config user.name in your clone |
| Maintainers credit | the Full name of your STACKIT Git profile, mirrored daily once you have declared it | your Git profile |
| The profile panel that opens on hover | your biography, website, address and contribution record | your Git profile, once you have declared them |
Your commit messages never appear on the site. The timeline names the author and the date and nothing else, because a commit message is written for the repository rather than for a reader.
Nothing is shown until you release it yourself, your name included. You do that once, in a declaration: open an issue in the content repository with the Contributor declaration template and tick the details you want shown. Framework Core or your framework owner records the result in settings/contributor-members.json, which is the only place the site reads it from. You cannot edit that file yourself. That is deliberate.
Until your declaration is recorded there, the daily pipeline publishes nothing about you, so a maintainer credit without one reads as an anonymous contributor with no hover panel at all. Your commits still carry your name inside the repository, as they do in any repository, but the website does not repeat it. A detail you did not release is not merely hidden: it is never fetched from your profile and never written down anywhere. Writing role: true next to your name in an asset does nothing either. Only the person a field describes can release it. A content file is not that person.
Two details are worth knowing before you tick the boxes. Your address only appears if you also made it public in your Git profile, because the API hands out a no-reply placeholder otherwise, and that is not a contact. Your contribution record is matched through the address on your commits, so it counts the commits you author under your own account. To change or withdraw any of it later, comment on your own declaration issue.
A pseudonym, a short form or just your initials are all fine in either place. Emptying the Full name works too: after the next mirroring run the maintainers credit shows “Anonymous contributor”, it never falls back to your username. If you would rather not have your private address in the commit history, set a no-reply identity in the same breath:
git config user.name "Your display name"git config user.email "your-username@noreply.scf-content.git.onstackit.cloud"Your address is never shown unless you ask for it: it appears only when a page lists it explicitly, or when you both made it public in your Git profile and the page opts in.
Install these two, in any order:
Nothing else gets installed. No Node, no pnpm, no build tools on your host.
With Docker Desktop you skip this section.
Point VS Code at podman. Open the settings (Ctrl + ,, on the Mac ⌘ + ,), search for dev containers path, change Dev > Containers: Docker Path from docker to podman, then restart VS Code. Without it the extension looks for a docker binary that is not there and the container never starts.
Give the machine memory and disk. The build and the test suite run inside the podman machine and the default one is too small for them. Set it up with room from the start:
podman machine init --memory 8192 --cpus 4 --disk-size 60podman machine startIf your machine already exists, adjust it afterwards:
podman machine stoppodman machine set --memory 8192 --cpus 4podman machine startOn Windows, do all of this inside WSL2 and clone into the Linux file system, for example ~/projects/scf-content.
A clone under /mnt/c/... looks like it works: the container starts, the site builds, the page loads. But file change events do not cross the Windows to Linux boundary reliably, so hot reload never fires and your edits appear to have no effect until you restart the server.
On the Git instance, open Settings, then Applications, then Generate new token. Grant exactly these permissions:
| Permission | Level | Needed for |
|---|---|---|
repository | Read and Write | cloning the content repo, pushing branches |
package | Read | pulling the prebuilt dev container image |
Above the permission list sits a dropdown called Repository and Organization Access. Leave it on All (public, private and limited). On “Public only” the token cannot see the private content repository at all, and cloning as well as the registry login fail with a 403 even though every permission above is set correctly.
Log in with your Git username and the token as the password, then pull the image:
docker login scf-content.git.onstackit.clouddocker image pull scf-content.git.onstackit.cloud/scf-core/scf-system:latestpodman is a drop-in replacement here: podman login and podman image pull take exactly the same arguments.
Pulling the image up front is optional, VS Code pulls it for you on the first container start. Doing it manually just makes the first start faster and shows you early whether the login worked.
The image is multi-arch: the same pull gives Intel and Windows machines the amd64 variant and Apple Silicon Macs the native arm64 variant, automatically. When you pull a newer image later, follow it with Rebuild Container in VS Code, because a plain reopen keeps the cached old container running. Superseded image versions pile up as untagged leftovers, so run docker image prune (or podman image prune) on your machine now and then to clear them out.
The content repository grants read access only, so your fork is the place you push to. Everybody works this way, Framework Core included. Open scf-core/scf-content and press Fork, then clone your copy with your Git username and the token as credentials:
git clone https://scf-content.git.onstackit.cloud/<your-username>/scf-content.gitcd scf-contentgit remote add upstream https://scf-content.git.onstackit.cloud/scf-core/scf-content.gitThe upstream remote is how you pull later changes from the shared repository into your fork.
One thing to know before you branch: your fork copies every branch this repository has on the day you fork it, half-finished ones included. Start new work from upstream/main and from nothing else, which is also why a fork that has fallen behind cannot get in your way. When you do want it up to date, your fork’s page shows a green banner with a button that does it in one click. On our instance that button still carries its untranslated label repo.sync_fork.button, so go by the green banner rather than by the wording. A branch you have kept for weeks wants main merged into it before you open the next pull request.
Open the folder in VS Code. It detects the dev container configuration and offers Reopen in Container, which is also available from the command palette. The first start pulls the image and takes a few minutes; every later start is quick.
Your clone is mounted into the prebuilt app as its content, which is why you can preview the complete site without ever touching the application repository.
You enter the token twice because two different tools remember it in two different places, and knowing where saves you a confusing afternoon later:
git fetch and git push against that host replays it silently.~/.config/containers/auth.json). The two do not share anything, which is why the registry login is its own step.There is no git logout. When you rotate a token, or signed in with the wrong account, git keeps replaying the stored login and never asks again — the fix is to clear the stored entry so the next fetch or push prompts fresh (in the VS Code terminal that prompt appears as an input box at the top of the window, not in the terminal):
printf "protocol=https\nhost=scf-content.git.onstackit.cloud\n\n" | git credential rejectOn Windows you can alternatively open the Credential Manager and remove the git:https://scf-content.git.onstackit.cloud entry there. To see which account macOS currently has stored for the host:
security find-internet-password -s scf-content.git.onstackit.cloud | grep acctYour commit identity is a separate thing entirely: git config user.name and user.email decide how your commits are labelled, the stored login only decides who you authenticate as when pushing.
In the container terminal, run:
hikeThe same thing is available as the VS Code task 🥾 Hike, Start Dev Docs. The site is forwarded to http://localhost:4321 with hot reload, so every save shows up in the browser within a second.
Type help to see the full tool belt:
| Command | What it does |
|---|---|
hike | dev server with hot reload on http://localhost:4321 |
summit | full production build |
panorama | serve the built site |
patrol | build plus the complete UI test suite, the same gate as your PR |
scout | how to update the dev container image |
Almost every failed setup comes down to one of these:
/mnt/c silently breaks hot reload. Work inside WSL2 and clone into the Linux file system.Branch off upstream/main rather than off your own main, then write:
git fetch upstreamgit switch -c content/short-description upstream/mainYour fork’s main falls behind the moment somebody else contributes, and a branch started on top of it drags that gap into your pull request. Fetching first costs a second and takes the question away entirely. When you do want the fork itself tidy, CONTRIBUTING has the commands for that.
For new pages, use the studios instead of copying frontmatter by hand:
http://localhost:4321/studio, writes a contributor profile, an asset, a trail or a framework page. It also loads an existing file and changes only what you edit, so everything you leave alone stays exactly as it was.http://localhost:4321/diagrambuilder, draws a diagram in the SCF design and saves it next to your page.Both run on your local dev server, and the SCF Studio runs on the dev site as well. It writes frontmatter that already satisfies the pipeline’s rules: a real description in the rewarded 120 to 160 character window, a category from the allowed list and at most 10 tags.
For the authoring rules behind the generated files, see the asset integration guide and the trail setup guide.
patrolpatrol reproduces what the pipeline runs: the production build, the UI test suite, and a walkthrough of every asset, trail and profile your branch touched. It takes a few minutes and saves you a review round, because a green patrol almost always means a green pull request.
Push your branch to your fork and open a pull request against main of the shared repository. The description arrives prefilled with three confirmations you have to tick: that you hold the rights to what you contribute, that it carries nobody’s personal data and nothing confidential, and that every link points at an official source. A separate check reads them and stays red until all three are ticked, so keep the prefilled text in place rather than replacing it with your own.
On the files your pull request touches, the pipeline checks:
<LinkCard> or <LinkChip>, and their on-site targets must exist — see the asset integration guideIt then builds the full site, runs the UI tests and posts a report on your pull request. A temporary, password-protected preview site is optional: tick the preview box in the description and your pages go up within fifteen minutes of the checks turning green, follow every push, then disappear when the pull request closes. Nothing depends on it, patrol shows you the same result locally.
A Framework Core reviewer approves and merges. You can also tick the automatic-merge box, then the merge happens on its own within ten minutes of an approval landing on a green pull request. Either way your content goes live with the next site deployment.
STACKIT
The sovereign European cloud provider behind the framework, delivering IaaS and PaaS from German and Austrian data centers with full digital independence.
Contributing to the STACKIT Cloud Framework means writing content, not running an application. The whole docs app ships as a prebuilt dev container image, and your clone of the content repository is mounted into it. This guide takes you from having nothing installed to an open pull request.
Three things, and only the first two touch your machine:
A STACKIT account. It is the identity you log in with, and it onboards you automatically.
A container runtime and an editor. Docker Desktop or podman, plus Visual Studio Code with the Dev Containers extension.
An access token from the Git instance, which you create in a later step and use as your password for both cloning and pulling the image.
You never need access to the application repository. Everything the site needs to build, Node, the docs app, the diagram toolchain and the test browser, is already inside the image.
If you do not have a STACKIT login yet, create one first at accounts.stackit.cloud , then come back to the next step.
Use a personal work address for it, in the form firstname.lastname@company.com. The Git instance builds your username from the part before the @. You cannot change that username later.
If the login works but the Git instance rejects you afterwards, your account is probably not in the STACKIT organization that hosts the instance. Contact Framework Core and we will sort it out.
Log in once via the STACKIT IDP at scf-content.git.onstackit.cloud . That single login does two things:
@, so with a personal address it reads firstname.lastname.Contributing here is public. The site credits people by name in two places: the history timeline on every asset and trail, and the Maintainers block on the pages you are listed for. That is the point of the credit, and you decide which name it is.
Three separate sources feed it:
| Where | Comes from | You change it in |
|---|---|---|
| History timeline | the author of your commits, shown as who and when | git config user.name in your clone |
| Maintainers credit | the Full name of your STACKIT Git profile, mirrored daily once you have declared it | your Git profile |
| The profile panel that opens on hover | your biography, website, address and contribution record | your Git profile, once you have declared them |
Your commit messages never appear on the site. The timeline names the author and the date and nothing else, because a commit message is written for the repository rather than for a reader.
Nothing is shown until you release it yourself, your name included. You do that once, in a declaration: open an issue in the content repository with the Contributor declaration template and tick the details you want shown. Framework Core or your framework owner records the result in settings/contributor-members.json, which is the only place the site reads it from. You cannot edit that file yourself. That is deliberate.
Until your declaration is recorded there, the daily pipeline publishes nothing about you, so a maintainer credit without one reads as an anonymous contributor with no hover panel at all. Your commits still carry your name inside the repository, as they do in any repository, but the website does not repeat it. A detail you did not release is not merely hidden: it is never fetched from your profile and never written down anywhere. Writing role: true next to your name in an asset does nothing either. Only the person a field describes can release it. A content file is not that person.
Two details are worth knowing before you tick the boxes. Your address only appears if you also made it public in your Git profile, because the API hands out a no-reply placeholder otherwise, and that is not a contact. Your contribution record is matched through the address on your commits, so it counts the commits you author under your own account. To change or withdraw any of it later, comment on your own declaration issue.
A pseudonym, a short form or just your initials are all fine in either place. Emptying the Full name works too: after the next mirroring run the maintainers credit shows “Anonymous contributor”, it never falls back to your username. If you would rather not have your private address in the commit history, set a no-reply identity in the same breath:
git config user.name "Your display name"git config user.email "your-username@noreply.scf-content.git.onstackit.cloud"Your address is never shown unless you ask for it: it appears only when a page lists it explicitly, or when you both made it public in your Git profile and the page opts in.
Install these two, in any order:
Nothing else gets installed. No Node, no pnpm, no build tools on your host.
With Docker Desktop you skip this section.
Point VS Code at podman. Open the settings (Ctrl + ,, on the Mac ⌘ + ,), search for dev containers path, change Dev > Containers: Docker Path from docker to podman, then restart VS Code. Without it the extension looks for a docker binary that is not there and the container never starts.
Give the machine memory and disk. The build and the test suite run inside the podman machine and the default one is too small for them. Set it up with room from the start:
podman machine init --memory 8192 --cpus 4 --disk-size 60podman machine startIf your machine already exists, adjust it afterwards:
podman machine stoppodman machine set --memory 8192 --cpus 4podman machine startOn Windows, do all of this inside WSL2 and clone into the Linux file system, for example ~/projects/scf-content.
A clone under /mnt/c/... looks like it works: the container starts, the site builds, the page loads. But file change events do not cross the Windows to Linux boundary reliably, so hot reload never fires and your edits appear to have no effect until you restart the server.
On the Git instance, open Settings, then Applications, then Generate new token. Grant exactly these permissions:
| Permission | Level | Needed for |
|---|---|---|
repository | Read and Write | cloning the content repo, pushing branches |
package | Read | pulling the prebuilt dev container image |
Above the permission list sits a dropdown called Repository and Organization Access. Leave it on All (public, private and limited). On “Public only” the token cannot see the private content repository at all, and cloning as well as the registry login fail with a 403 even though every permission above is set correctly.
Log in with your Git username and the token as the password, then pull the image:
docker login scf-content.git.onstackit.clouddocker image pull scf-content.git.onstackit.cloud/scf-core/scf-system:latestpodman is a drop-in replacement here: podman login and podman image pull take exactly the same arguments.
Pulling the image up front is optional, VS Code pulls it for you on the first container start. Doing it manually just makes the first start faster and shows you early whether the login worked.
The image is multi-arch: the same pull gives Intel and Windows machines the amd64 variant and Apple Silicon Macs the native arm64 variant, automatically. When you pull a newer image later, follow it with Rebuild Container in VS Code, because a plain reopen keeps the cached old container running. Superseded image versions pile up as untagged leftovers, so run docker image prune (or podman image prune) on your machine now and then to clear them out.
The content repository grants read access only, so your fork is the place you push to. Everybody works this way, Framework Core included. Open scf-core/scf-content and press Fork, then clone your copy with your Git username and the token as credentials:
git clone https://scf-content.git.onstackit.cloud/<your-username>/scf-content.gitcd scf-contentgit remote add upstream https://scf-content.git.onstackit.cloud/scf-core/scf-content.gitThe upstream remote is how you pull later changes from the shared repository into your fork.
One thing to know before you branch: your fork copies every branch this repository has on the day you fork it, half-finished ones included. Start new work from upstream/main and from nothing else, which is also why a fork that has fallen behind cannot get in your way. When you do want it up to date, your fork’s page shows a green banner with a button that does it in one click. On our instance that button still carries its untranslated label repo.sync_fork.button, so go by the green banner rather than by the wording. A branch you have kept for weeks wants main merged into it before you open the next pull request.
Open the folder in VS Code. It detects the dev container configuration and offers Reopen in Container, which is also available from the command palette. The first start pulls the image and takes a few minutes; every later start is quick.
Your clone is mounted into the prebuilt app as its content, which is why you can preview the complete site without ever touching the application repository.
You enter the token twice because two different tools remember it in two different places, and knowing where saves you a confusing afternoon later:
git fetch and git push against that host replays it silently.~/.config/containers/auth.json). The two do not share anything, which is why the registry login is its own step.There is no git logout. When you rotate a token, or signed in with the wrong account, git keeps replaying the stored login and never asks again — the fix is to clear the stored entry so the next fetch or push prompts fresh (in the VS Code terminal that prompt appears as an input box at the top of the window, not in the terminal):
printf "protocol=https\nhost=scf-content.git.onstackit.cloud\n\n" | git credential rejectOn Windows you can alternatively open the Credential Manager and remove the git:https://scf-content.git.onstackit.cloud entry there. To see which account macOS currently has stored for the host:
security find-internet-password -s scf-content.git.onstackit.cloud | grep acctYour commit identity is a separate thing entirely: git config user.name and user.email decide how your commits are labelled, the stored login only decides who you authenticate as when pushing.
In the container terminal, run:
hikeThe same thing is available as the VS Code task 🥾 Hike, Start Dev Docs. The site is forwarded to http://localhost:4321 with hot reload, so every save shows up in the browser within a second.
Type help to see the full tool belt:
| Command | What it does |
|---|---|
hike | dev server with hot reload on http://localhost:4321 |
summit | full production build |
panorama | serve the built site |
patrol | build plus the complete UI test suite, the same gate as your PR |
scout | how to update the dev container image |
Almost every failed setup comes down to one of these:
/mnt/c silently breaks hot reload. Work inside WSL2 and clone into the Linux file system.Branch off upstream/main rather than off your own main, then write:
git fetch upstreamgit switch -c content/short-description upstream/mainYour fork’s main falls behind the moment somebody else contributes, and a branch started on top of it drags that gap into your pull request. Fetching first costs a second and takes the question away entirely. When you do want the fork itself tidy, CONTRIBUTING has the commands for that.
For new pages, use the studios instead of copying frontmatter by hand:
http://localhost:4321/studio, writes a contributor profile, an asset, a trail or a framework page. It also loads an existing file and changes only what you edit, so everything you leave alone stays exactly as it was.http://localhost:4321/diagrambuilder, draws a diagram in the SCF design and saves it next to your page.Both run on your local dev server, and the SCF Studio runs on the dev site as well. It writes frontmatter that already satisfies the pipeline’s rules: a real description in the rewarded 120 to 160 character window, a category from the allowed list and at most 10 tags.
For the authoring rules behind the generated files, see the asset integration guide and the trail setup guide.
patrolpatrol reproduces what the pipeline runs: the production build, the UI test suite, and a walkthrough of every asset, trail and profile your branch touched. It takes a few minutes and saves you a review round, because a green patrol almost always means a green pull request.
Push your branch to your fork and open a pull request against main of the shared repository. The description arrives prefilled with three confirmations you have to tick: that you hold the rights to what you contribute, that it carries nobody’s personal data and nothing confidential, and that every link points at an official source. A separate check reads them and stays red until all three are ticked, so keep the prefilled text in place rather than replacing it with your own.
On the files your pull request touches, the pipeline checks:
<LinkCard> or <LinkChip>, and their on-site targets must exist — see the asset integration guideIt then builds the full site, runs the UI tests and posts a report on your pull request. A temporary, password-protected preview site is optional: tick the preview box in the description and your pages go up within fifteen minutes of the checks turning green, follow every push, then disappear when the pull request closes. Nothing depends on it, patrol shows you the same result locally.
A Framework Core reviewer approves and merges. You can also tick the automatic-merge box, then the merge happens on its own within ten minutes of an approval landing on a green pull request. Either way your content goes live with the next site deployment.
Create it on the Git instance under Settings, Applications. It is your password for the clone and for the image. It is shown exactly once, so save it in your password manager.
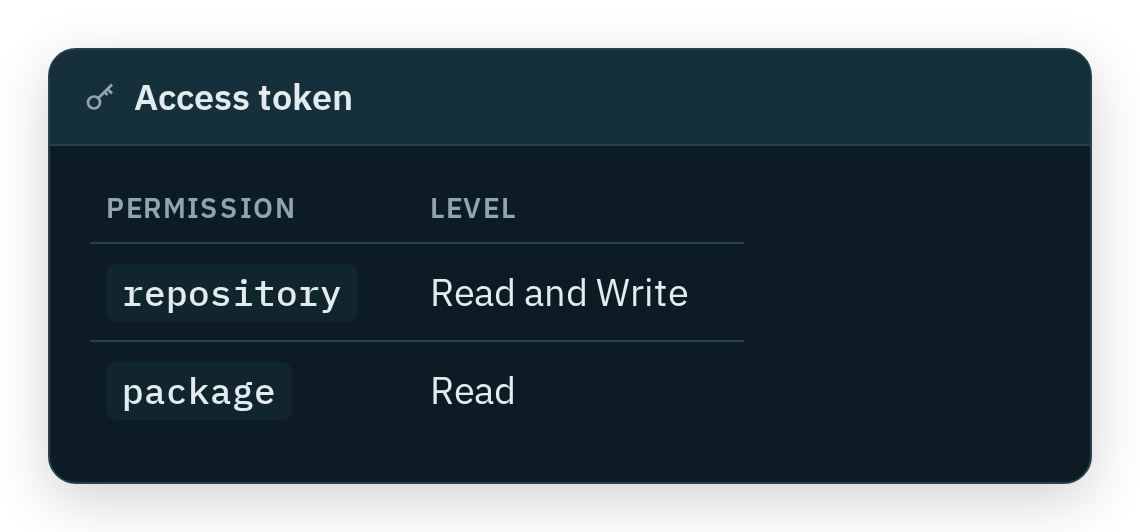
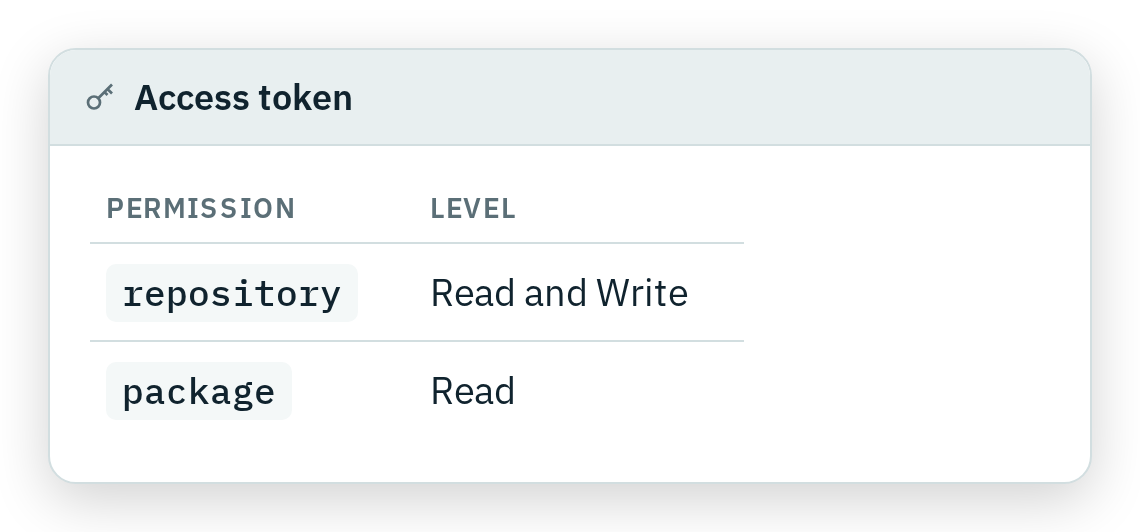
Contributing to the STACKIT Cloud Framework means writing content, not running an application. The whole docs app ships as a prebuilt dev container image, and your clone of the content repository is mounted into it. This guide takes you from having nothing installed to an open pull request.
Three things, and only the first two touch your machine:
A STACKIT account. It is the identity you log in with, and it onboards you automatically.
A container runtime and an editor. Docker Desktop or podman, plus Visual Studio Code with the Dev Containers extension.
An access token from the Git instance, which you create in a later step and use as your password for both cloning and pulling the image.
You never need access to the application repository. Everything the site needs to build, Node, the docs app, the diagram toolchain and the test browser, is already inside the image.
If you do not have a STACKIT login yet, create one first at accounts.stackit.cloud , then come back to the next step.
Use a personal work address for it, in the form firstname.lastname@company.com. The Git instance builds your username from the part before the @. You cannot change that username later.
If the login works but the Git instance rejects you afterwards, your account is probably not in the STACKIT organization that hosts the instance. Contact Framework Core and we will sort it out.
Log in once via the STACKIT IDP at scf-content.git.onstackit.cloud . That single login does two things:
@, so with a personal address it reads firstname.lastname.Contributing here is public. The site credits people by name in two places: the history timeline on every asset and trail, and the Maintainers block on the pages you are listed for. That is the point of the credit, and you decide which name it is.
Three separate sources feed it:
| Where | Comes from | You change it in |
|---|---|---|
| History timeline | the author of your commits, shown as who and when | git config user.name in your clone |
| Maintainers credit | the Full name of your STACKIT Git profile, mirrored daily once you have declared it | your Git profile |
| The profile panel that opens on hover | your biography, website, address and contribution record | your Git profile, once you have declared them |
Your commit messages never appear on the site. The timeline names the author and the date and nothing else, because a commit message is written for the repository rather than for a reader.
Nothing is shown until you release it yourself, your name included. You do that once, in a declaration: open an issue in the content repository with the Contributor declaration template and tick the details you want shown. Framework Core or your framework owner records the result in settings/contributor-members.json, which is the only place the site reads it from. You cannot edit that file yourself. That is deliberate.
Until your declaration is recorded there, the daily pipeline publishes nothing about you, so a maintainer credit without one reads as an anonymous contributor with no hover panel at all. Your commits still carry your name inside the repository, as they do in any repository, but the website does not repeat it. A detail you did not release is not merely hidden: it is never fetched from your profile and never written down anywhere. Writing role: true next to your name in an asset does nothing either. Only the person a field describes can release it. A content file is not that person.
Two details are worth knowing before you tick the boxes. Your address only appears if you also made it public in your Git profile, because the API hands out a no-reply placeholder otherwise, and that is not a contact. Your contribution record is matched through the address on your commits, so it counts the commits you author under your own account. To change or withdraw any of it later, comment on your own declaration issue.
A pseudonym, a short form or just your initials are all fine in either place. Emptying the Full name works too: after the next mirroring run the maintainers credit shows “Anonymous contributor”, it never falls back to your username. If you would rather not have your private address in the commit history, set a no-reply identity in the same breath:
git config user.name "Your display name"git config user.email "your-username@noreply.scf-content.git.onstackit.cloud"Your address is never shown unless you ask for it: it appears only when a page lists it explicitly, or when you both made it public in your Git profile and the page opts in.
Install these two, in any order:
Nothing else gets installed. No Node, no pnpm, no build tools on your host.
With Docker Desktop you skip this section.
Point VS Code at podman. Open the settings (Ctrl + ,, on the Mac ⌘ + ,), search for dev containers path, change Dev > Containers: Docker Path from docker to podman, then restart VS Code. Without it the extension looks for a docker binary that is not there and the container never starts.
Give the machine memory and disk. The build and the test suite run inside the podman machine and the default one is too small for them. Set it up with room from the start:
podman machine init --memory 8192 --cpus 4 --disk-size 60podman machine startIf your machine already exists, adjust it afterwards:
podman machine stoppodman machine set --memory 8192 --cpus 4podman machine startOn Windows, do all of this inside WSL2 and clone into the Linux file system, for example ~/projects/scf-content.
A clone under /mnt/c/... looks like it works: the container starts, the site builds, the page loads. But file change events do not cross the Windows to Linux boundary reliably, so hot reload never fires and your edits appear to have no effect until you restart the server.
On the Git instance, open Settings, then Applications, then Generate new token. Grant exactly these permissions:
| Permission | Level | Needed for |
|---|---|---|
repository | Read and Write | cloning the content repo, pushing branches |
package | Read | pulling the prebuilt dev container image |
Above the permission list sits a dropdown called Repository and Organization Access. Leave it on All (public, private and limited). On “Public only” the token cannot see the private content repository at all, and cloning as well as the registry login fail with a 403 even though every permission above is set correctly.
Log in with your Git username and the token as the password, then pull the image:
docker login scf-content.git.onstackit.clouddocker image pull scf-content.git.onstackit.cloud/scf-core/scf-system:latestpodman is a drop-in replacement here: podman login and podman image pull take exactly the same arguments.
Pulling the image up front is optional, VS Code pulls it for you on the first container start. Doing it manually just makes the first start faster and shows you early whether the login worked.
The image is multi-arch: the same pull gives Intel and Windows machines the amd64 variant and Apple Silicon Macs the native arm64 variant, automatically. When you pull a newer image later, follow it with Rebuild Container in VS Code, because a plain reopen keeps the cached old container running. Superseded image versions pile up as untagged leftovers, so run docker image prune (or podman image prune) on your machine now and then to clear them out.
The content repository grants read access only, so your fork is the place you push to. Everybody works this way, Framework Core included. Open scf-core/scf-content and press Fork, then clone your copy with your Git username and the token as credentials:
git clone https://scf-content.git.onstackit.cloud/<your-username>/scf-content.gitcd scf-contentgit remote add upstream https://scf-content.git.onstackit.cloud/scf-core/scf-content.gitThe upstream remote is how you pull later changes from the shared repository into your fork.
One thing to know before you branch: your fork copies every branch this repository has on the day you fork it, half-finished ones included. Start new work from upstream/main and from nothing else, which is also why a fork that has fallen behind cannot get in your way. When you do want it up to date, your fork’s page shows a green banner with a button that does it in one click. On our instance that button still carries its untranslated label repo.sync_fork.button, so go by the green banner rather than by the wording. A branch you have kept for weeks wants main merged into it before you open the next pull request.
Open the folder in VS Code. It detects the dev container configuration and offers Reopen in Container, which is also available from the command palette. The first start pulls the image and takes a few minutes; every later start is quick.
Your clone is mounted into the prebuilt app as its content, which is why you can preview the complete site without ever touching the application repository.
You enter the token twice because two different tools remember it in two different places, and knowing where saves you a confusing afternoon later:
git fetch and git push against that host replays it silently.~/.config/containers/auth.json). The two do not share anything, which is why the registry login is its own step.There is no git logout. When you rotate a token, or signed in with the wrong account, git keeps replaying the stored login and never asks again — the fix is to clear the stored entry so the next fetch or push prompts fresh (in the VS Code terminal that prompt appears as an input box at the top of the window, not in the terminal):
printf "protocol=https\nhost=scf-content.git.onstackit.cloud\n\n" | git credential rejectOn Windows you can alternatively open the Credential Manager and remove the git:https://scf-content.git.onstackit.cloud entry there. To see which account macOS currently has stored for the host:
security find-internet-password -s scf-content.git.onstackit.cloud | grep acctYour commit identity is a separate thing entirely: git config user.name and user.email decide how your commits are labelled, the stored login only decides who you authenticate as when pushing.
In the container terminal, run:
hikeThe same thing is available as the VS Code task 🥾 Hike, Start Dev Docs. The site is forwarded to http://localhost:4321 with hot reload, so every save shows up in the browser within a second.
Type help to see the full tool belt:
| Command | What it does |
|---|---|
hike | dev server with hot reload on http://localhost:4321 |
summit | full production build |
panorama | serve the built site |
patrol | build plus the complete UI test suite, the same gate as your PR |
scout | how to update the dev container image |
Almost every failed setup comes down to one of these:
/mnt/c silently breaks hot reload. Work inside WSL2 and clone into the Linux file system.Branch off upstream/main rather than off your own main, then write:
git fetch upstreamgit switch -c content/short-description upstream/mainYour fork’s main falls behind the moment somebody else contributes, and a branch started on top of it drags that gap into your pull request. Fetching first costs a second and takes the question away entirely. When you do want the fork itself tidy, CONTRIBUTING has the commands for that.
For new pages, use the studios instead of copying frontmatter by hand:
http://localhost:4321/studio, writes a contributor profile, an asset, a trail or a framework page. It also loads an existing file and changes only what you edit, so everything you leave alone stays exactly as it was.http://localhost:4321/diagrambuilder, draws a diagram in the SCF design and saves it next to your page.Both run on your local dev server, and the SCF Studio runs on the dev site as well. It writes frontmatter that already satisfies the pipeline’s rules: a real description in the rewarded 120 to 160 character window, a category from the allowed list and at most 10 tags.
For the authoring rules behind the generated files, see the asset integration guide and the trail setup guide.
patrolpatrol reproduces what the pipeline runs: the production build, the UI test suite, and a walkthrough of every asset, trail and profile your branch touched. It takes a few minutes and saves you a review round, because a green patrol almost always means a green pull request.
Push your branch to your fork and open a pull request against main of the shared repository. The description arrives prefilled with three confirmations you have to tick: that you hold the rights to what you contribute, that it carries nobody’s personal data and nothing confidential, and that every link points at an official source. A separate check reads them and stays red until all three are ticked, so keep the prefilled text in place rather than replacing it with your own.
On the files your pull request touches, the pipeline checks:
<LinkCard> or <LinkChip>, and their on-site targets must exist — see the asset integration guideIt then builds the full site, runs the UI tests and posts a report on your pull request. A temporary, password-protected preview site is optional: tick the preview box in the description and your pages go up within fifteen minutes of the checks turning green, follow every push, then disappear when the pull request closes. Nothing depends on it, patrol shows you the same result locally.
A Framework Core reviewer approves and merges. You can also tick the automatic-merge box, then the merge happens on its own within ten minutes of an approval landing on a green pull request. Either way your content goes live with the next site deployment.
Log in with your Git username and the token as the password, then pull the image. Run this in a terminal on your computer. Inside the container there is no docker or podman.
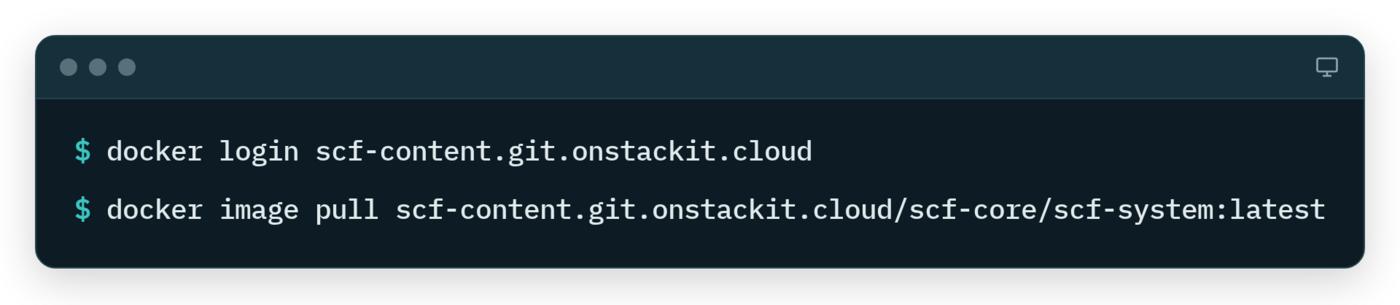
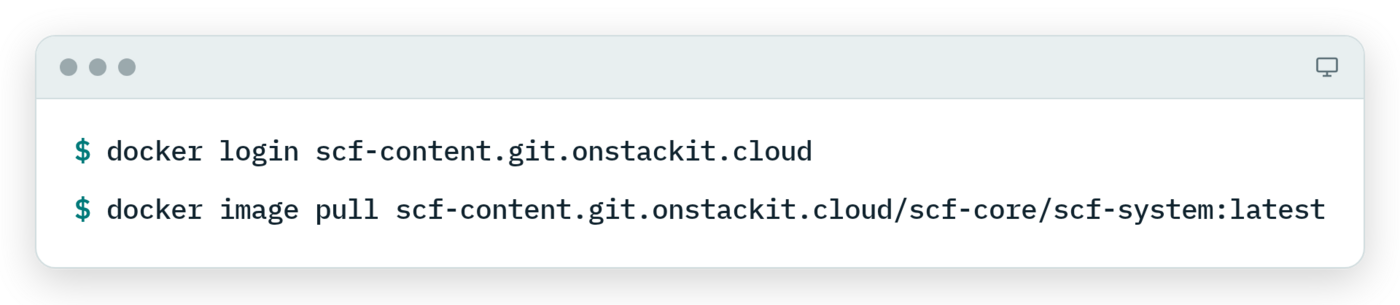
Contributing to the STACKIT Cloud Framework means writing content, not running an application. The whole docs app ships as a prebuilt dev container image, and your clone of the content repository is mounted into it. This guide takes you from having nothing installed to an open pull request.
Three things, and only the first two touch your machine:
A STACKIT account. It is the identity you log in with, and it onboards you automatically.
A container runtime and an editor. Docker Desktop or podman, plus Visual Studio Code with the Dev Containers extension.
An access token from the Git instance, which you create in a later step and use as your password for both cloning and pulling the image.
You never need access to the application repository. Everything the site needs to build, Node, the docs app, the diagram toolchain and the test browser, is already inside the image.
If you do not have a STACKIT login yet, create one first at accounts.stackit.cloud , then come back to the next step.
Use a personal work address for it, in the form firstname.lastname@company.com. The Git instance builds your username from the part before the @. You cannot change that username later.
If the login works but the Git instance rejects you afterwards, your account is probably not in the STACKIT organization that hosts the instance. Contact Framework Core and we will sort it out.
Log in once via the STACKIT IDP at scf-content.git.onstackit.cloud . That single login does two things:
@, so with a personal address it reads firstname.lastname.Contributing here is public. The site credits people by name in two places: the history timeline on every asset and trail, and the Maintainers block on the pages you are listed for. That is the point of the credit, and you decide which name it is.
Three separate sources feed it:
| Where | Comes from | You change it in |
|---|---|---|
| History timeline | the author of your commits, shown as who and when | git config user.name in your clone |
| Maintainers credit | the Full name of your STACKIT Git profile, mirrored daily once you have declared it | your Git profile |
| The profile panel that opens on hover | your biography, website, address and contribution record | your Git profile, once you have declared them |
Your commit messages never appear on the site. The timeline names the author and the date and nothing else, because a commit message is written for the repository rather than for a reader.
Nothing is shown until you release it yourself, your name included. You do that once, in a declaration: open an issue in the content repository with the Contributor declaration template and tick the details you want shown. Framework Core or your framework owner records the result in settings/contributor-members.json, which is the only place the site reads it from. You cannot edit that file yourself. That is deliberate.
Until your declaration is recorded there, the daily pipeline publishes nothing about you, so a maintainer credit without one reads as an anonymous contributor with no hover panel at all. Your commits still carry your name inside the repository, as they do in any repository, but the website does not repeat it. A detail you did not release is not merely hidden: it is never fetched from your profile and never written down anywhere. Writing role: true next to your name in an asset does nothing either. Only the person a field describes can release it. A content file is not that person.
Two details are worth knowing before you tick the boxes. Your address only appears if you also made it public in your Git profile, because the API hands out a no-reply placeholder otherwise, and that is not a contact. Your contribution record is matched through the address on your commits, so it counts the commits you author under your own account. To change or withdraw any of it later, comment on your own declaration issue.
A pseudonym, a short form or just your initials are all fine in either place. Emptying the Full name works too: after the next mirroring run the maintainers credit shows “Anonymous contributor”, it never falls back to your username. If you would rather not have your private address in the commit history, set a no-reply identity in the same breath:
git config user.name "Your display name"git config user.email "your-username@noreply.scf-content.git.onstackit.cloud"Your address is never shown unless you ask for it: it appears only when a page lists it explicitly, or when you both made it public in your Git profile and the page opts in.
Install these two, in any order:
Nothing else gets installed. No Node, no pnpm, no build tools on your host.
With Docker Desktop you skip this section.
Point VS Code at podman. Open the settings (Ctrl + ,, on the Mac ⌘ + ,), search for dev containers path, change Dev > Containers: Docker Path from docker to podman, then restart VS Code. Without it the extension looks for a docker binary that is not there and the container never starts.
Give the machine memory and disk. The build and the test suite run inside the podman machine and the default one is too small for them. Set it up with room from the start:
podman machine init --memory 8192 --cpus 4 --disk-size 60podman machine startIf your machine already exists, adjust it afterwards:
podman machine stoppodman machine set --memory 8192 --cpus 4podman machine startOn Windows, do all of this inside WSL2 and clone into the Linux file system, for example ~/projects/scf-content.
A clone under /mnt/c/... looks like it works: the container starts, the site builds, the page loads. But file change events do not cross the Windows to Linux boundary reliably, so hot reload never fires and your edits appear to have no effect until you restart the server.
On the Git instance, open Settings, then Applications, then Generate new token. Grant exactly these permissions:
| Permission | Level | Needed for |
|---|---|---|
repository | Read and Write | cloning the content repo, pushing branches |
package | Read | pulling the prebuilt dev container image |
Above the permission list sits a dropdown called Repository and Organization Access. Leave it on All (public, private and limited). On “Public only” the token cannot see the private content repository at all, and cloning as well as the registry login fail with a 403 even though every permission above is set correctly.
Log in with your Git username and the token as the password, then pull the image:
docker login scf-content.git.onstackit.clouddocker image pull scf-content.git.onstackit.cloud/scf-core/scf-system:latestpodman is a drop-in replacement here: podman login and podman image pull take exactly the same arguments.
Pulling the image up front is optional, VS Code pulls it for you on the first container start. Doing it manually just makes the first start faster and shows you early whether the login worked.
The image is multi-arch: the same pull gives Intel and Windows machines the amd64 variant and Apple Silicon Macs the native arm64 variant, automatically. When you pull a newer image later, follow it with Rebuild Container in VS Code, because a plain reopen keeps the cached old container running. Superseded image versions pile up as untagged leftovers, so run docker image prune (or podman image prune) on your machine now and then to clear them out.
The content repository grants read access only, so your fork is the place you push to. Everybody works this way, Framework Core included. Open scf-core/scf-content and press Fork, then clone your copy with your Git username and the token as credentials:
git clone https://scf-content.git.onstackit.cloud/<your-username>/scf-content.gitcd scf-contentgit remote add upstream https://scf-content.git.onstackit.cloud/scf-core/scf-content.gitThe upstream remote is how you pull later changes from the shared repository into your fork.
One thing to know before you branch: your fork copies every branch this repository has on the day you fork it, half-finished ones included. Start new work from upstream/main and from nothing else, which is also why a fork that has fallen behind cannot get in your way. When you do want it up to date, your fork’s page shows a green banner with a button that does it in one click. On our instance that button still carries its untranslated label repo.sync_fork.button, so go by the green banner rather than by the wording. A branch you have kept for weeks wants main merged into it before you open the next pull request.
Open the folder in VS Code. It detects the dev container configuration and offers Reopen in Container, which is also available from the command palette. The first start pulls the image and takes a few minutes; every later start is quick.
Your clone is mounted into the prebuilt app as its content, which is why you can preview the complete site without ever touching the application repository.
You enter the token twice because two different tools remember it in two different places, and knowing where saves you a confusing afternoon later:
git fetch and git push against that host replays it silently.~/.config/containers/auth.json). The two do not share anything, which is why the registry login is its own step.There is no git logout. When you rotate a token, or signed in with the wrong account, git keeps replaying the stored login and never asks again — the fix is to clear the stored entry so the next fetch or push prompts fresh (in the VS Code terminal that prompt appears as an input box at the top of the window, not in the terminal):
printf "protocol=https\nhost=scf-content.git.onstackit.cloud\n\n" | git credential rejectOn Windows you can alternatively open the Credential Manager and remove the git:https://scf-content.git.onstackit.cloud entry there. To see which account macOS currently has stored for the host:
security find-internet-password -s scf-content.git.onstackit.cloud | grep acctYour commit identity is a separate thing entirely: git config user.name and user.email decide how your commits are labelled, the stored login only decides who you authenticate as when pushing.
In the container terminal, run:
hikeThe same thing is available as the VS Code task 🥾 Hike, Start Dev Docs. The site is forwarded to http://localhost:4321 with hot reload, so every save shows up in the browser within a second.
Type help to see the full tool belt:
| Command | What it does |
|---|---|
hike | dev server with hot reload on http://localhost:4321 |
summit | full production build |
panorama | serve the built site |
patrol | build plus the complete UI test suite, the same gate as your PR |
scout | how to update the dev container image |
Almost every failed setup comes down to one of these:
/mnt/c silently breaks hot reload. Work inside WSL2 and clone into the Linux file system.Branch off upstream/main rather than off your own main, then write:
git fetch upstreamgit switch -c content/short-description upstream/mainYour fork’s main falls behind the moment somebody else contributes, and a branch started on top of it drags that gap into your pull request. Fetching first costs a second and takes the question away entirely. When you do want the fork itself tidy, CONTRIBUTING has the commands for that.
For new pages, use the studios instead of copying frontmatter by hand:
http://localhost:4321/studio, writes a contributor profile, an asset, a trail or a framework page. It also loads an existing file and changes only what you edit, so everything you leave alone stays exactly as it was.http://localhost:4321/diagrambuilder, draws a diagram in the SCF design and saves it next to your page.Both run on your local dev server, and the SCF Studio runs on the dev site as well. It writes frontmatter that already satisfies the pipeline’s rules: a real description in the rewarded 120 to 160 character window, a category from the allowed list and at most 10 tags.
For the authoring rules behind the generated files, see the asset integration guide and the trail setup guide.
patrolpatrol reproduces what the pipeline runs: the production build, the UI test suite, and a walkthrough of every asset, trail and profile your branch touched. It takes a few minutes and saves you a review round, because a green patrol almost always means a green pull request.
Push your branch to your fork and open a pull request against main of the shared repository. The description arrives prefilled with three confirmations you have to tick: that you hold the rights to what you contribute, that it carries nobody’s personal data and nothing confidential, and that every link points at an official source. A separate check reads them and stays red until all three are ticked, so keep the prefilled text in place rather than replacing it with your own.
On the files your pull request touches, the pipeline checks:
<LinkCard> or <LinkChip>, and their on-site targets must exist — see the asset integration guideIt then builds the full site, runs the UI tests and posts a report on your pull request. A temporary, password-protected preview site is optional: tick the preview box in the description and your pages go up within fifteen minutes of the checks turning green, follow every push, then disappear when the pull request closes. Nothing depends on it, patrol shows you the same result locally.
A Framework Core reviewer approves and merges. You can also tick the automatic-merge box, then the merge happens on its own within ten minutes of an approval landing on a green pull request. Either way your content goes live with the next site deployment.
Fork the shared repository, clone your fork and add the shared one as upstream. Then open the folder in VS Code and choose Reopen in Container.
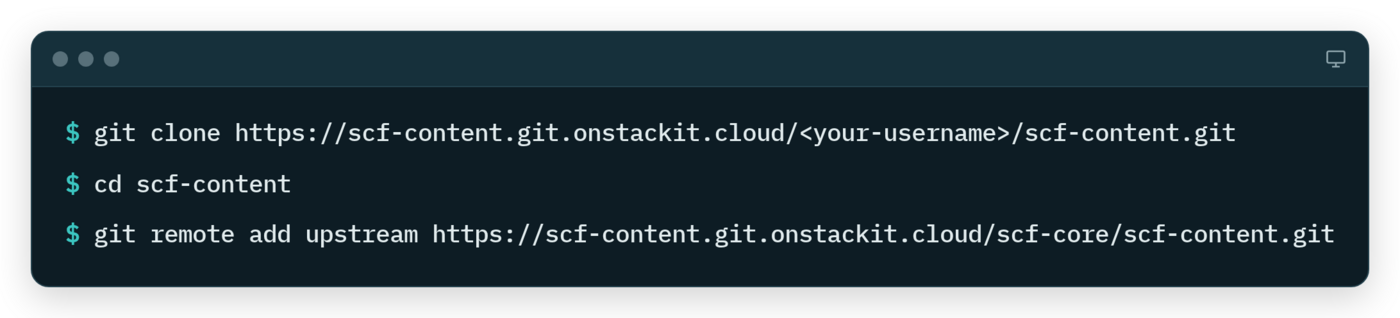
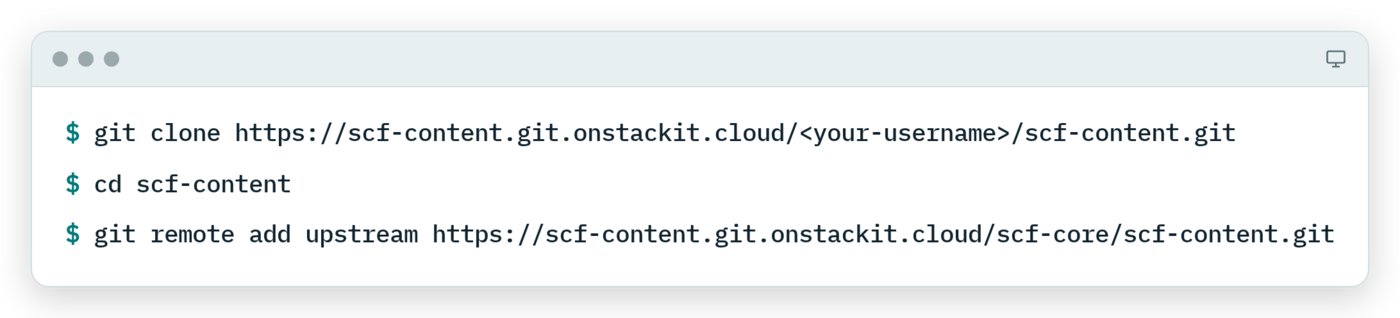
Contributing to the STACKIT Cloud Framework means writing content, not running an application. The whole docs app ships as a prebuilt dev container image, and your clone of the content repository is mounted into it. This guide takes you from having nothing installed to an open pull request.
Three things, and only the first two touch your machine:
A STACKIT account. It is the identity you log in with, and it onboards you automatically.
A container runtime and an editor. Docker Desktop or podman, plus Visual Studio Code with the Dev Containers extension.
An access token from the Git instance, which you create in a later step and use as your password for both cloning and pulling the image.
You never need access to the application repository. Everything the site needs to build, Node, the docs app, the diagram toolchain and the test browser, is already inside the image.
If you do not have a STACKIT login yet, create one first at accounts.stackit.cloud , then come back to the next step.
Use a personal work address for it, in the form firstname.lastname@company.com. The Git instance builds your username from the part before the @. You cannot change that username later.
If the login works but the Git instance rejects you afterwards, your account is probably not in the STACKIT organization that hosts the instance. Contact Framework Core and we will sort it out.
Log in once via the STACKIT IDP at scf-content.git.onstackit.cloud . That single login does two things:
@, so with a personal address it reads firstname.lastname.Contributing here is public. The site credits people by name in two places: the history timeline on every asset and trail, and the Maintainers block on the pages you are listed for. That is the point of the credit, and you decide which name it is.
Three separate sources feed it:
| Where | Comes from | You change it in |
|---|---|---|
| History timeline | the author of your commits, shown as who and when | git config user.name in your clone |
| Maintainers credit | the Full name of your STACKIT Git profile, mirrored daily once you have declared it | your Git profile |
| The profile panel that opens on hover | your biography, website, address and contribution record | your Git profile, once you have declared them |
Your commit messages never appear on the site. The timeline names the author and the date and nothing else, because a commit message is written for the repository rather than for a reader.
Nothing is shown until you release it yourself, your name included. You do that once, in a declaration: open an issue in the content repository with the Contributor declaration template and tick the details you want shown. Framework Core or your framework owner records the result in settings/contributor-members.json, which is the only place the site reads it from. You cannot edit that file yourself. That is deliberate.
Until your declaration is recorded there, the daily pipeline publishes nothing about you, so a maintainer credit without one reads as an anonymous contributor with no hover panel at all. Your commits still carry your name inside the repository, as they do in any repository, but the website does not repeat it. A detail you did not release is not merely hidden: it is never fetched from your profile and never written down anywhere. Writing role: true next to your name in an asset does nothing either. Only the person a field describes can release it. A content file is not that person.
Two details are worth knowing before you tick the boxes. Your address only appears if you also made it public in your Git profile, because the API hands out a no-reply placeholder otherwise, and that is not a contact. Your contribution record is matched through the address on your commits, so it counts the commits you author under your own account. To change or withdraw any of it later, comment on your own declaration issue.
A pseudonym, a short form or just your initials are all fine in either place. Emptying the Full name works too: after the next mirroring run the maintainers credit shows “Anonymous contributor”, it never falls back to your username. If you would rather not have your private address in the commit history, set a no-reply identity in the same breath:
git config user.name "Your display name"git config user.email "your-username@noreply.scf-content.git.onstackit.cloud"Your address is never shown unless you ask for it: it appears only when a page lists it explicitly, or when you both made it public in your Git profile and the page opts in.
Install these two, in any order:
Nothing else gets installed. No Node, no pnpm, no build tools on your host.
With Docker Desktop you skip this section.
Point VS Code at podman. Open the settings (Ctrl + ,, on the Mac ⌘ + ,), search for dev containers path, change Dev > Containers: Docker Path from docker to podman, then restart VS Code. Without it the extension looks for a docker binary that is not there and the container never starts.
Give the machine memory and disk. The build and the test suite run inside the podman machine and the default one is too small for them. Set it up with room from the start:
podman machine init --memory 8192 --cpus 4 --disk-size 60podman machine startIf your machine already exists, adjust it afterwards:
podman machine stoppodman machine set --memory 8192 --cpus 4podman machine startOn Windows, do all of this inside WSL2 and clone into the Linux file system, for example ~/projects/scf-content.
A clone under /mnt/c/... looks like it works: the container starts, the site builds, the page loads. But file change events do not cross the Windows to Linux boundary reliably, so hot reload never fires and your edits appear to have no effect until you restart the server.
On the Git instance, open Settings, then Applications, then Generate new token. Grant exactly these permissions:
| Permission | Level | Needed for |
|---|---|---|
repository | Read and Write | cloning the content repo, pushing branches |
package | Read | pulling the prebuilt dev container image |
Above the permission list sits a dropdown called Repository and Organization Access. Leave it on All (public, private and limited). On “Public only” the token cannot see the private content repository at all, and cloning as well as the registry login fail with a 403 even though every permission above is set correctly.
Log in with your Git username and the token as the password, then pull the image:
docker login scf-content.git.onstackit.clouddocker image pull scf-content.git.onstackit.cloud/scf-core/scf-system:latestpodman is a drop-in replacement here: podman login and podman image pull take exactly the same arguments.
Pulling the image up front is optional, VS Code pulls it for you on the first container start. Doing it manually just makes the first start faster and shows you early whether the login worked.
The image is multi-arch: the same pull gives Intel and Windows machines the amd64 variant and Apple Silicon Macs the native arm64 variant, automatically. When you pull a newer image later, follow it with Rebuild Container in VS Code, because a plain reopen keeps the cached old container running. Superseded image versions pile up as untagged leftovers, so run docker image prune (or podman image prune) on your machine now and then to clear them out.
The content repository grants read access only, so your fork is the place you push to. Everybody works this way, Framework Core included. Open scf-core/scf-content and press Fork, then clone your copy with your Git username and the token as credentials:
git clone https://scf-content.git.onstackit.cloud/<your-username>/scf-content.gitcd scf-contentgit remote add upstream https://scf-content.git.onstackit.cloud/scf-core/scf-content.gitThe upstream remote is how you pull later changes from the shared repository into your fork.
One thing to know before you branch: your fork copies every branch this repository has on the day you fork it, half-finished ones included. Start new work from upstream/main and from nothing else, which is also why a fork that has fallen behind cannot get in your way. When you do want it up to date, your fork’s page shows a green banner with a button that does it in one click. On our instance that button still carries its untranslated label repo.sync_fork.button, so go by the green banner rather than by the wording. A branch you have kept for weeks wants main merged into it before you open the next pull request.
Open the folder in VS Code. It detects the dev container configuration and offers Reopen in Container, which is also available from the command palette. The first start pulls the image and takes a few minutes; every later start is quick.
Your clone is mounted into the prebuilt app as its content, which is why you can preview the complete site without ever touching the application repository.
You enter the token twice because two different tools remember it in two different places, and knowing where saves you a confusing afternoon later:
git fetch and git push against that host replays it silently.~/.config/containers/auth.json). The two do not share anything, which is why the registry login is its own step.There is no git logout. When you rotate a token, or signed in with the wrong account, git keeps replaying the stored login and never asks again — the fix is to clear the stored entry so the next fetch or push prompts fresh (in the VS Code terminal that prompt appears as an input box at the top of the window, not in the terminal):
printf "protocol=https\nhost=scf-content.git.onstackit.cloud\n\n" | git credential rejectOn Windows you can alternatively open the Credential Manager and remove the git:https://scf-content.git.onstackit.cloud entry there. To see which account macOS currently has stored for the host:
security find-internet-password -s scf-content.git.onstackit.cloud | grep acctYour commit identity is a separate thing entirely: git config user.name and user.email decide how your commits are labelled, the stored login only decides who you authenticate as when pushing.
In the container terminal, run:
hikeThe same thing is available as the VS Code task 🥾 Hike, Start Dev Docs. The site is forwarded to http://localhost:4321 with hot reload, so every save shows up in the browser within a second.
Type help to see the full tool belt:
| Command | What it does |
|---|---|
hike | dev server with hot reload on http://localhost:4321 |
summit | full production build |
panorama | serve the built site |
patrol | build plus the complete UI test suite, the same gate as your PR |
scout | how to update the dev container image |
Almost every failed setup comes down to one of these:
/mnt/c silently breaks hot reload. Work inside WSL2 and clone into the Linux file system.Branch off upstream/main rather than off your own main, then write:
git fetch upstreamgit switch -c content/short-description upstream/mainYour fork’s main falls behind the moment somebody else contributes, and a branch started on top of it drags that gap into your pull request. Fetching first costs a second and takes the question away entirely. When you do want the fork itself tidy, CONTRIBUTING has the commands for that.
For new pages, use the studios instead of copying frontmatter by hand:
http://localhost:4321/studio, writes a contributor profile, an asset, a trail or a framework page. It also loads an existing file and changes only what you edit, so everything you leave alone stays exactly as it was.http://localhost:4321/diagrambuilder, draws a diagram in the SCF design and saves it next to your page.Both run on your local dev server, and the SCF Studio runs on the dev site as well. It writes frontmatter that already satisfies the pipeline’s rules: a real description in the rewarded 120 to 160 character window, a category from the allowed list and at most 10 tags.
For the authoring rules behind the generated files, see the asset integration guide and the trail setup guide.
patrolpatrol reproduces what the pipeline runs: the production build, the UI test suite, and a walkthrough of every asset, trail and profile your branch touched. It takes a few minutes and saves you a review round, because a green patrol almost always means a green pull request.
Push your branch to your fork and open a pull request against main of the shared repository. The description arrives prefilled with three confirmations you have to tick: that you hold the rights to what you contribute, that it carries nobody’s personal data and nothing confidential, and that every link points at an official source. A separate check reads them and stays red until all three are ticked, so keep the prefilled text in place rather than replacing it with your own.
On the files your pull request touches, the pipeline checks:
<LinkCard> or <LinkChip>, and their on-site targets must exist — see the asset integration guideIt then builds the full site, runs the UI tests and posts a report on your pull request. A temporary, password-protected preview site is optional: tick the preview box in the description and your pages go up within fifteen minutes of the checks turning green, follow every push, then disappear when the pull request closes. Nothing depends on it, patrol shows you the same result locally.
A Framework Core reviewer approves and merges. You can also tick the automatic-merge box, then the merge happens on its own within ten minutes of an approval landing on a green pull request. Either way your content goes live with the next site deployment.
Run hike in the container terminal. The real site opens on localhost:4321 with the components your readers see, and every save shows up within a second. Type help for the other tools.
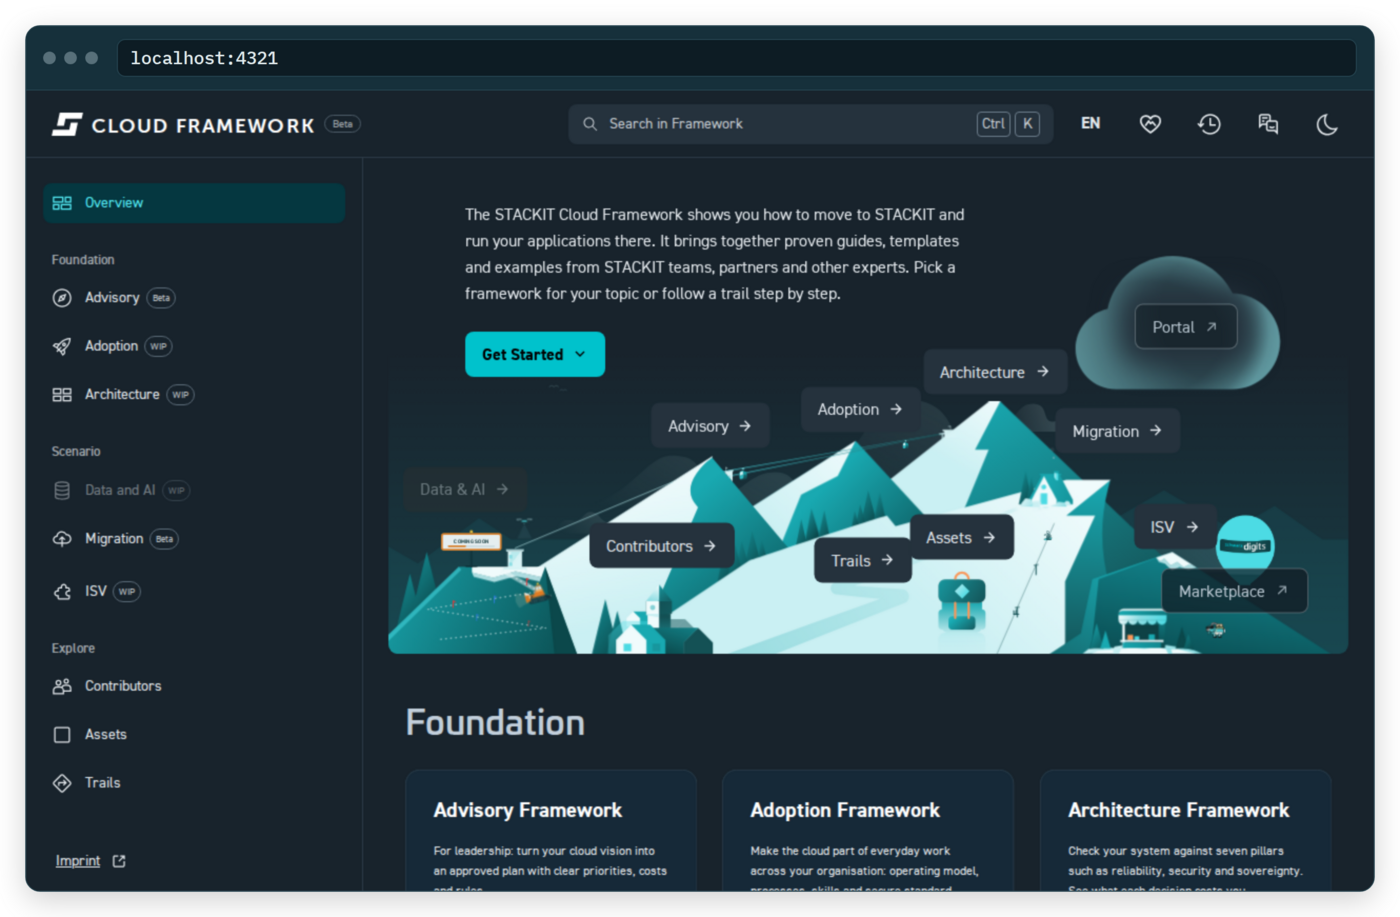
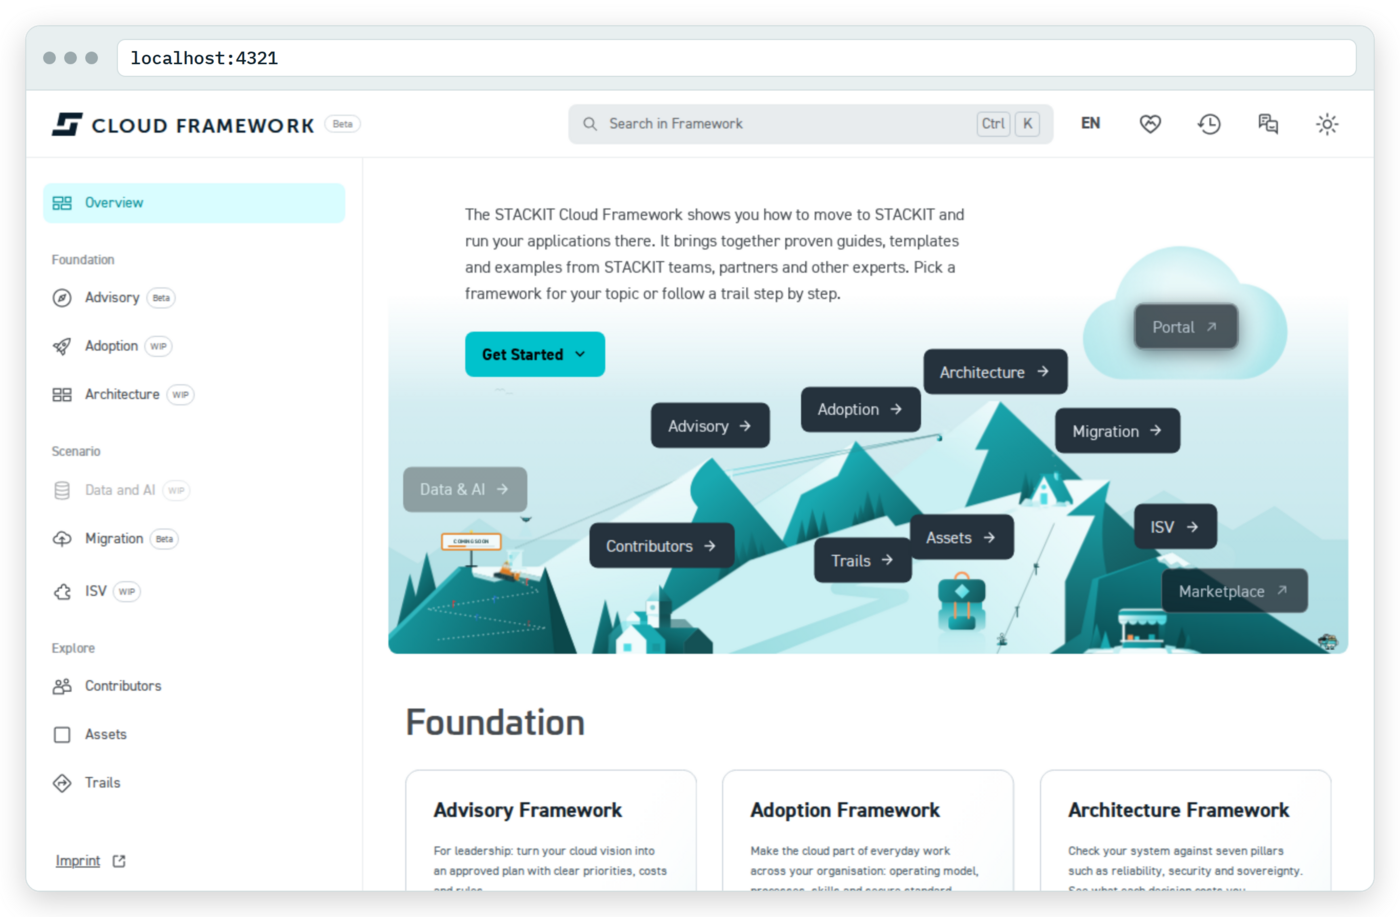
Contributing to the STACKIT Cloud Framework means writing content, not running an application. The whole docs app ships as a prebuilt dev container image, and your clone of the content repository is mounted into it. This guide takes you from having nothing installed to an open pull request.
Three things, and only the first two touch your machine:
A STACKIT account. It is the identity you log in with, and it onboards you automatically.
A container runtime and an editor. Docker Desktop or podman, plus Visual Studio Code with the Dev Containers extension.
An access token from the Git instance, which you create in a later step and use as your password for both cloning and pulling the image.
You never need access to the application repository. Everything the site needs to build, Node, the docs app, the diagram toolchain and the test browser, is already inside the image.
If you do not have a STACKIT login yet, create one first at accounts.stackit.cloud , then come back to the next step.
Use a personal work address for it, in the form firstname.lastname@company.com. The Git instance builds your username from the part before the @. You cannot change that username later.
If the login works but the Git instance rejects you afterwards, your account is probably not in the STACKIT organization that hosts the instance. Contact Framework Core and we will sort it out.
Log in once via the STACKIT IDP at scf-content.git.onstackit.cloud . That single login does two things:
@, so with a personal address it reads firstname.lastname.Contributing here is public. The site credits people by name in two places: the history timeline on every asset and trail, and the Maintainers block on the pages you are listed for. That is the point of the credit, and you decide which name it is.
Three separate sources feed it:
| Where | Comes from | You change it in |
|---|---|---|
| History timeline | the author of your commits, shown as who and when | git config user.name in your clone |
| Maintainers credit | the Full name of your STACKIT Git profile, mirrored daily once you have declared it | your Git profile |
| The profile panel that opens on hover | your biography, website, address and contribution record | your Git profile, once you have declared them |
Your commit messages never appear on the site. The timeline names the author and the date and nothing else, because a commit message is written for the repository rather than for a reader.
Nothing is shown until you release it yourself, your name included. You do that once, in a declaration: open an issue in the content repository with the Contributor declaration template and tick the details you want shown. Framework Core or your framework owner records the result in settings/contributor-members.json, which is the only place the site reads it from. You cannot edit that file yourself. That is deliberate.
Until your declaration is recorded there, the daily pipeline publishes nothing about you, so a maintainer credit without one reads as an anonymous contributor with no hover panel at all. Your commits still carry your name inside the repository, as they do in any repository, but the website does not repeat it. A detail you did not release is not merely hidden: it is never fetched from your profile and never written down anywhere. Writing role: true next to your name in an asset does nothing either. Only the person a field describes can release it. A content file is not that person.
Two details are worth knowing before you tick the boxes. Your address only appears if you also made it public in your Git profile, because the API hands out a no-reply placeholder otherwise, and that is not a contact. Your contribution record is matched through the address on your commits, so it counts the commits you author under your own account. To change or withdraw any of it later, comment on your own declaration issue.
A pseudonym, a short form or just your initials are all fine in either place. Emptying the Full name works too: after the next mirroring run the maintainers credit shows “Anonymous contributor”, it never falls back to your username. If you would rather not have your private address in the commit history, set a no-reply identity in the same breath:
git config user.name "Your display name"git config user.email "your-username@noreply.scf-content.git.onstackit.cloud"Your address is never shown unless you ask for it: it appears only when a page lists it explicitly, or when you both made it public in your Git profile and the page opts in.
Install these two, in any order:
Nothing else gets installed. No Node, no pnpm, no build tools on your host.
With Docker Desktop you skip this section.
Point VS Code at podman. Open the settings (Ctrl + ,, on the Mac ⌘ + ,), search for dev containers path, change Dev > Containers: Docker Path from docker to podman, then restart VS Code. Without it the extension looks for a docker binary that is not there and the container never starts.
Give the machine memory and disk. The build and the test suite run inside the podman machine and the default one is too small for them. Set it up with room from the start:
podman machine init --memory 8192 --cpus 4 --disk-size 60podman machine startIf your machine already exists, adjust it afterwards:
podman machine stoppodman machine set --memory 8192 --cpus 4podman machine startOn Windows, do all of this inside WSL2 and clone into the Linux file system, for example ~/projects/scf-content.
A clone under /mnt/c/... looks like it works: the container starts, the site builds, the page loads. But file change events do not cross the Windows to Linux boundary reliably, so hot reload never fires and your edits appear to have no effect until you restart the server.
On the Git instance, open Settings, then Applications, then Generate new token. Grant exactly these permissions:
| Permission | Level | Needed for |
|---|---|---|
repository | Read and Write | cloning the content repo, pushing branches |
package | Read | pulling the prebuilt dev container image |
Above the permission list sits a dropdown called Repository and Organization Access. Leave it on All (public, private and limited). On “Public only” the token cannot see the private content repository at all, and cloning as well as the registry login fail with a 403 even though every permission above is set correctly.
Log in with your Git username and the token as the password, then pull the image:
docker login scf-content.git.onstackit.clouddocker image pull scf-content.git.onstackit.cloud/scf-core/scf-system:latestpodman is a drop-in replacement here: podman login and podman image pull take exactly the same arguments.
Pulling the image up front is optional, VS Code pulls it for you on the first container start. Doing it manually just makes the first start faster and shows you early whether the login worked.
The image is multi-arch: the same pull gives Intel and Windows machines the amd64 variant and Apple Silicon Macs the native arm64 variant, automatically. When you pull a newer image later, follow it with Rebuild Container in VS Code, because a plain reopen keeps the cached old container running. Superseded image versions pile up as untagged leftovers, so run docker image prune (or podman image prune) on your machine now and then to clear them out.
The content repository grants read access only, so your fork is the place you push to. Everybody works this way, Framework Core included. Open scf-core/scf-content and press Fork, then clone your copy with your Git username and the token as credentials:
git clone https://scf-content.git.onstackit.cloud/<your-username>/scf-content.gitcd scf-contentgit remote add upstream https://scf-content.git.onstackit.cloud/scf-core/scf-content.gitThe upstream remote is how you pull later changes from the shared repository into your fork.
One thing to know before you branch: your fork copies every branch this repository has on the day you fork it, half-finished ones included. Start new work from upstream/main and from nothing else, which is also why a fork that has fallen behind cannot get in your way. When you do want it up to date, your fork’s page shows a green banner with a button that does it in one click. On our instance that button still carries its untranslated label repo.sync_fork.button, so go by the green banner rather than by the wording. A branch you have kept for weeks wants main merged into it before you open the next pull request.
Open the folder in VS Code. It detects the dev container configuration and offers Reopen in Container, which is also available from the command palette. The first start pulls the image and takes a few minutes; every later start is quick.
Your clone is mounted into the prebuilt app as its content, which is why you can preview the complete site without ever touching the application repository.
You enter the token twice because two different tools remember it in two different places, and knowing where saves you a confusing afternoon later:
git fetch and git push against that host replays it silently.~/.config/containers/auth.json). The two do not share anything, which is why the registry login is its own step.There is no git logout. When you rotate a token, or signed in with the wrong account, git keeps replaying the stored login and never asks again — the fix is to clear the stored entry so the next fetch or push prompts fresh (in the VS Code terminal that prompt appears as an input box at the top of the window, not in the terminal):
printf "protocol=https\nhost=scf-content.git.onstackit.cloud\n\n" | git credential rejectOn Windows you can alternatively open the Credential Manager and remove the git:https://scf-content.git.onstackit.cloud entry there. To see which account macOS currently has stored for the host:
security find-internet-password -s scf-content.git.onstackit.cloud | grep acctYour commit identity is a separate thing entirely: git config user.name and user.email decide how your commits are labelled, the stored login only decides who you authenticate as when pushing.
In the container terminal, run:
hikeThe same thing is available as the VS Code task 🥾 Hike, Start Dev Docs. The site is forwarded to http://localhost:4321 with hot reload, so every save shows up in the browser within a second.
Type help to see the full tool belt:
| Command | What it does |
|---|---|
hike | dev server with hot reload on http://localhost:4321 |
summit | full production build |
panorama | serve the built site |
patrol | build plus the complete UI test suite, the same gate as your PR |
scout | how to update the dev container image |
Almost every failed setup comes down to one of these:
/mnt/c silently breaks hot reload. Work inside WSL2 and clone into the Linux file system.Branch off upstream/main rather than off your own main, then write:
git fetch upstreamgit switch -c content/short-description upstream/mainYour fork’s main falls behind the moment somebody else contributes, and a branch started on top of it drags that gap into your pull request. Fetching first costs a second and takes the question away entirely. When you do want the fork itself tidy, CONTRIBUTING has the commands for that.
For new pages, use the studios instead of copying frontmatter by hand:
http://localhost:4321/studio, writes a contributor profile, an asset, a trail or a framework page. It also loads an existing file and changes only what you edit, so everything you leave alone stays exactly as it was.http://localhost:4321/diagrambuilder, draws a diagram in the SCF design and saves it next to your page.Both run on your local dev server, and the SCF Studio runs on the dev site as well. It writes frontmatter that already satisfies the pipeline’s rules: a real description in the rewarded 120 to 160 character window, a category from the allowed list and at most 10 tags.
For the authoring rules behind the generated files, see the asset integration guide and the trail setup guide.
patrolpatrol reproduces what the pipeline runs: the production build, the UI test suite, and a walkthrough of every asset, trail and profile your branch touched. It takes a few minutes and saves you a review round, because a green patrol almost always means a green pull request.
Push your branch to your fork and open a pull request against main of the shared repository. The description arrives prefilled with three confirmations you have to tick: that you hold the rights to what you contribute, that it carries nobody’s personal data and nothing confidential, and that every link points at an official source. A separate check reads them and stays red until all three are ticked, so keep the prefilled text in place rather than replacing it with your own.
On the files your pull request touches, the pipeline checks:
<LinkCard> or <LinkChip>, and their on-site targets must exist — see the asset integration guideIt then builds the full site, runs the UI tests and posts a report on your pull request. A temporary, password-protected preview site is optional: tick the preview box in the description and your pages go up within fifteen minutes of the checks turning green, follow every push, then disappear when the pull request closes. Nothing depends on it, patrol shows you the same result locally.
A Framework Core reviewer approves and merges. You can also tick the automatic-merge box, then the merge happens on its own within ten minutes of an approval landing on a green pull request. Either way your content goes live with the next site deployment.
The token is shown only once. The registry login belongs on your own computer. On Windows, a clone under /mnt/c silently breaks hot reload.
Contributing to the STACKIT Cloud Framework means writing content, not running an application. The whole docs app ships as a prebuilt dev container image, and your clone of the content repository is mounted into it. This guide takes you from having nothing installed to an open pull request.
Three things, and only the first two touch your machine:
A STACKIT account. It is the identity you log in with, and it onboards you automatically.
A container runtime and an editor. Docker Desktop or podman, plus Visual Studio Code with the Dev Containers extension.
An access token from the Git instance, which you create in a later step and use as your password for both cloning and pulling the image.
You never need access to the application repository. Everything the site needs to build, Node, the docs app, the diagram toolchain and the test browser, is already inside the image.
If you do not have a STACKIT login yet, create one first at accounts.stackit.cloud , then come back to the next step.
Use a personal work address for it, in the form firstname.lastname@company.com. The Git instance builds your username from the part before the @. You cannot change that username later.
If the login works but the Git instance rejects you afterwards, your account is probably not in the STACKIT organization that hosts the instance. Contact Framework Core and we will sort it out.
Log in once via the STACKIT IDP at scf-content.git.onstackit.cloud . That single login does two things:
@, so with a personal address it reads firstname.lastname.Contributing here is public. The site credits people by name in two places: the history timeline on every asset and trail, and the Maintainers block on the pages you are listed for. That is the point of the credit, and you decide which name it is.
Three separate sources feed it:
| Where | Comes from | You change it in |
|---|---|---|
| History timeline | the author of your commits, shown as who and when | git config user.name in your clone |
| Maintainers credit | the Full name of your STACKIT Git profile, mirrored daily once you have declared it | your Git profile |
| The profile panel that opens on hover | your biography, website, address and contribution record | your Git profile, once you have declared them |
Your commit messages never appear on the site. The timeline names the author and the date and nothing else, because a commit message is written for the repository rather than for a reader.
Nothing is shown until you release it yourself, your name included. You do that once, in a declaration: open an issue in the content repository with the Contributor declaration template and tick the details you want shown. Framework Core or your framework owner records the result in settings/contributor-members.json, which is the only place the site reads it from. You cannot edit that file yourself. That is deliberate.
Until your declaration is recorded there, the daily pipeline publishes nothing about you, so a maintainer credit without one reads as an anonymous contributor with no hover panel at all. Your commits still carry your name inside the repository, as they do in any repository, but the website does not repeat it. A detail you did not release is not merely hidden: it is never fetched from your profile and never written down anywhere. Writing role: true next to your name in an asset does nothing either. Only the person a field describes can release it. A content file is not that person.
Two details are worth knowing before you tick the boxes. Your address only appears if you also made it public in your Git profile, because the API hands out a no-reply placeholder otherwise, and that is not a contact. Your contribution record is matched through the address on your commits, so it counts the commits you author under your own account. To change or withdraw any of it later, comment on your own declaration issue.
A pseudonym, a short form or just your initials are all fine in either place. Emptying the Full name works too: after the next mirroring run the maintainers credit shows “Anonymous contributor”, it never falls back to your username. If you would rather not have your private address in the commit history, set a no-reply identity in the same breath:
git config user.name "Your display name"git config user.email "your-username@noreply.scf-content.git.onstackit.cloud"Your address is never shown unless you ask for it: it appears only when a page lists it explicitly, or when you both made it public in your Git profile and the page opts in.
Install these two, in any order:
Nothing else gets installed. No Node, no pnpm, no build tools on your host.
With Docker Desktop you skip this section.
Point VS Code at podman. Open the settings (Ctrl + ,, on the Mac ⌘ + ,), search for dev containers path, change Dev > Containers: Docker Path from docker to podman, then restart VS Code. Without it the extension looks for a docker binary that is not there and the container never starts.
Give the machine memory and disk. The build and the test suite run inside the podman machine and the default one is too small for them. Set it up with room from the start:
podman machine init --memory 8192 --cpus 4 --disk-size 60podman machine startIf your machine already exists, adjust it afterwards:
podman machine stoppodman machine set --memory 8192 --cpus 4podman machine startOn Windows, do all of this inside WSL2 and clone into the Linux file system, for example ~/projects/scf-content.
A clone under /mnt/c/... looks like it works: the container starts, the site builds, the page loads. But file change events do not cross the Windows to Linux boundary reliably, so hot reload never fires and your edits appear to have no effect until you restart the server.
On the Git instance, open Settings, then Applications, then Generate new token. Grant exactly these permissions:
| Permission | Level | Needed for |
|---|---|---|
repository | Read and Write | cloning the content repo, pushing branches |
package | Read | pulling the prebuilt dev container image |
Above the permission list sits a dropdown called Repository and Organization Access. Leave it on All (public, private and limited). On “Public only” the token cannot see the private content repository at all, and cloning as well as the registry login fail with a 403 even though every permission above is set correctly.
Log in with your Git username and the token as the password, then pull the image:
docker login scf-content.git.onstackit.clouddocker image pull scf-content.git.onstackit.cloud/scf-core/scf-system:latestpodman is a drop-in replacement here: podman login and podman image pull take exactly the same arguments.
Pulling the image up front is optional, VS Code pulls it for you on the first container start. Doing it manually just makes the first start faster and shows you early whether the login worked.
The image is multi-arch: the same pull gives Intel and Windows machines the amd64 variant and Apple Silicon Macs the native arm64 variant, automatically. When you pull a newer image later, follow it with Rebuild Container in VS Code, because a plain reopen keeps the cached old container running. Superseded image versions pile up as untagged leftovers, so run docker image prune (or podman image prune) on your machine now and then to clear them out.
The content repository grants read access only, so your fork is the place you push to. Everybody works this way, Framework Core included. Open scf-core/scf-content and press Fork, then clone your copy with your Git username and the token as credentials:
git clone https://scf-content.git.onstackit.cloud/<your-username>/scf-content.gitcd scf-contentgit remote add upstream https://scf-content.git.onstackit.cloud/scf-core/scf-content.gitThe upstream remote is how you pull later changes from the shared repository into your fork.
One thing to know before you branch: your fork copies every branch this repository has on the day you fork it, half-finished ones included. Start new work from upstream/main and from nothing else, which is also why a fork that has fallen behind cannot get in your way. When you do want it up to date, your fork’s page shows a green banner with a button that does it in one click. On our instance that button still carries its untranslated label repo.sync_fork.button, so go by the green banner rather than by the wording. A branch you have kept for weeks wants main merged into it before you open the next pull request.
Open the folder in VS Code. It detects the dev container configuration and offers Reopen in Container, which is also available from the command palette. The first start pulls the image and takes a few minutes; every later start is quick.
Your clone is mounted into the prebuilt app as its content, which is why you can preview the complete site without ever touching the application repository.
You enter the token twice because two different tools remember it in two different places, and knowing where saves you a confusing afternoon later:
git fetch and git push against that host replays it silently.~/.config/containers/auth.json). The two do not share anything, which is why the registry login is its own step.There is no git logout. When you rotate a token, or signed in with the wrong account, git keeps replaying the stored login and never asks again — the fix is to clear the stored entry so the next fetch or push prompts fresh (in the VS Code terminal that prompt appears as an input box at the top of the window, not in the terminal):
printf "protocol=https\nhost=scf-content.git.onstackit.cloud\n\n" | git credential rejectOn Windows you can alternatively open the Credential Manager and remove the git:https://scf-content.git.onstackit.cloud entry there. To see which account macOS currently has stored for the host:
security find-internet-password -s scf-content.git.onstackit.cloud | grep acctYour commit identity is a separate thing entirely: git config user.name and user.email decide how your commits are labelled, the stored login only decides who you authenticate as when pushing.
In the container terminal, run:
hikeThe same thing is available as the VS Code task 🥾 Hike, Start Dev Docs. The site is forwarded to http://localhost:4321 with hot reload, so every save shows up in the browser within a second.
Type help to see the full tool belt:
| Command | What it does |
|---|---|
hike | dev server with hot reload on http://localhost:4321 |
summit | full production build |
panorama | serve the built site |
patrol | build plus the complete UI test suite, the same gate as your PR |
scout | how to update the dev container image |
Almost every failed setup comes down to one of these:
/mnt/c silently breaks hot reload. Work inside WSL2 and clone into the Linux file system.Branch off upstream/main rather than off your own main, then write:
git fetch upstreamgit switch -c content/short-description upstream/mainYour fork’s main falls behind the moment somebody else contributes, and a branch started on top of it drags that gap into your pull request. Fetching first costs a second and takes the question away entirely. When you do want the fork itself tidy, CONTRIBUTING has the commands for that.
For new pages, use the studios instead of copying frontmatter by hand:
http://localhost:4321/studio, writes a contributor profile, an asset, a trail or a framework page. It also loads an existing file and changes only what you edit, so everything you leave alone stays exactly as it was.http://localhost:4321/diagrambuilder, draws a diagram in the SCF design and saves it next to your page.Both run on your local dev server, and the SCF Studio runs on the dev site as well. It writes frontmatter that already satisfies the pipeline’s rules: a real description in the rewarded 120 to 160 character window, a category from the allowed list and at most 10 tags.
For the authoring rules behind the generated files, see the asset integration guide and the trail setup guide.
patrolpatrol reproduces what the pipeline runs: the production build, the UI test suite, and a walkthrough of every asset, trail and profile your branch touched. It takes a few minutes and saves you a review round, because a green patrol almost always means a green pull request.
Push your branch to your fork and open a pull request against main of the shared repository. The description arrives prefilled with three confirmations you have to tick: that you hold the rights to what you contribute, that it carries nobody’s personal data and nothing confidential, and that every link points at an official source. A separate check reads them and stays red until all three are ticked, so keep the prefilled text in place rather than replacing it with your own.
On the files your pull request touches, the pipeline checks:
<LinkCard> or <LinkChip>, and their on-site targets must exist — see the asset integration guideIt then builds the full site, runs the UI tests and posts a report on your pull request. A temporary, password-protected preview site is optional: tick the preview box in the description and your pages go up within fifteen minutes of the checks turning green, follow every push, then disappear when the pull request closes. Nothing depends on it, patrol shows you the same result locally.
A Framework Core reviewer approves and merges. You can also tick the automatic-merge box, then the merge happens on its own within ten minutes of an approval landing on a green pull request. Either way your content goes live with the next site deployment.
Frontmatter is where most first pull requests fail. The SCF Studio writes it from a form, with a valid description, category and tags. It runs in your container and on the dev site.
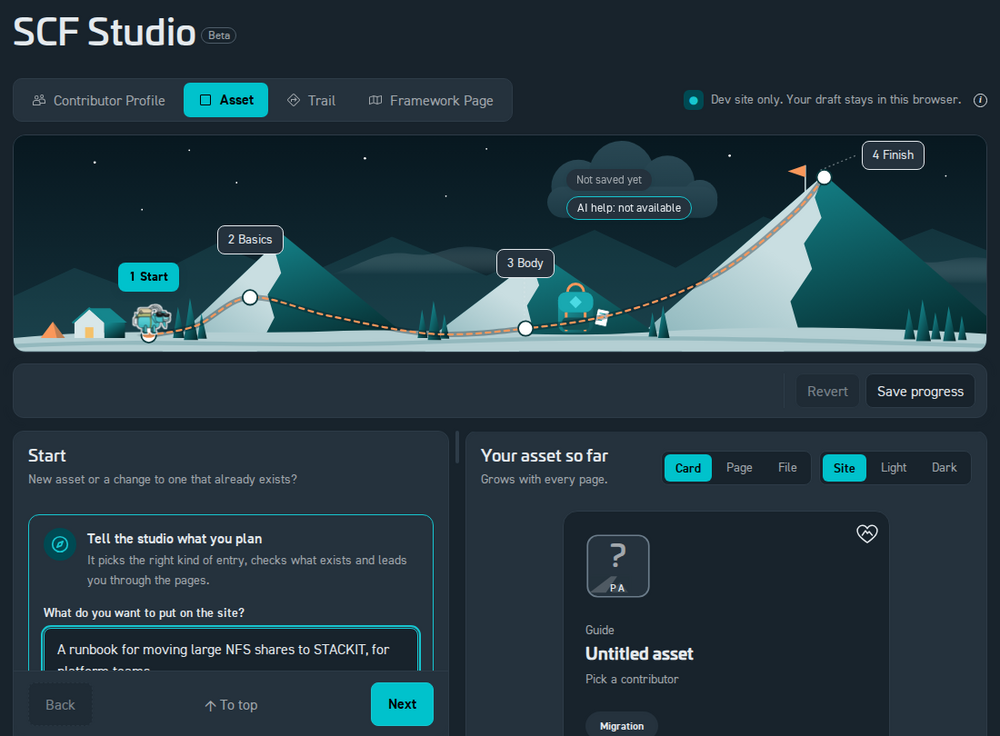
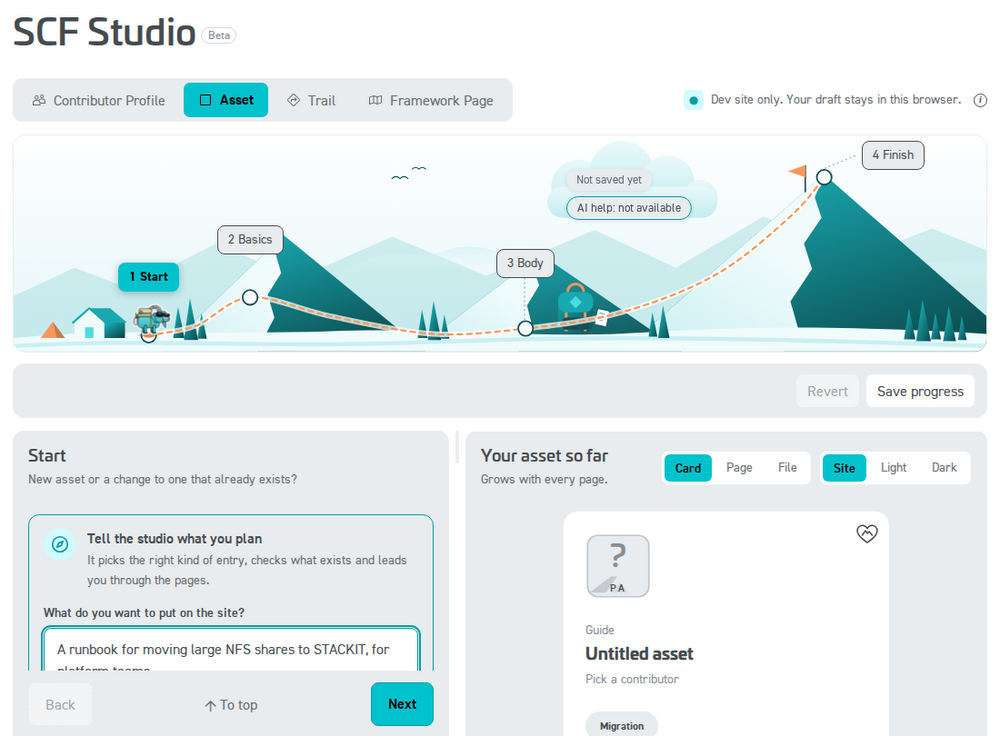
Contributing to the STACKIT Cloud Framework means writing content, not running an application. The whole docs app ships as a prebuilt dev container image, and your clone of the content repository is mounted into it. This guide takes you from having nothing installed to an open pull request.
Three things, and only the first two touch your machine:
A STACKIT account. It is the identity you log in with, and it onboards you automatically.
A container runtime and an editor. Docker Desktop or podman, plus Visual Studio Code with the Dev Containers extension.
An access token from the Git instance, which you create in a later step and use as your password for both cloning and pulling the image.
You never need access to the application repository. Everything the site needs to build, Node, the docs app, the diagram toolchain and the test browser, is already inside the image.
If you do not have a STACKIT login yet, create one first at accounts.stackit.cloud , then come back to the next step.
Use a personal work address for it, in the form firstname.lastname@company.com. The Git instance builds your username from the part before the @. You cannot change that username later.
If the login works but the Git instance rejects you afterwards, your account is probably not in the STACKIT organization that hosts the instance. Contact Framework Core and we will sort it out.
Log in once via the STACKIT IDP at scf-content.git.onstackit.cloud . That single login does two things:
@, so with a personal address it reads firstname.lastname.Contributing here is public. The site credits people by name in two places: the history timeline on every asset and trail, and the Maintainers block on the pages you are listed for. That is the point of the credit, and you decide which name it is.
Three separate sources feed it:
| Where | Comes from | You change it in |
|---|---|---|
| History timeline | the author of your commits, shown as who and when | git config user.name in your clone |
| Maintainers credit | the Full name of your STACKIT Git profile, mirrored daily once you have declared it | your Git profile |
| The profile panel that opens on hover | your biography, website, address and contribution record | your Git profile, once you have declared them |
Your commit messages never appear on the site. The timeline names the author and the date and nothing else, because a commit message is written for the repository rather than for a reader.
Nothing is shown until you release it yourself, your name included. You do that once, in a declaration: open an issue in the content repository with the Contributor declaration template and tick the details you want shown. Framework Core or your framework owner records the result in settings/contributor-members.json, which is the only place the site reads it from. You cannot edit that file yourself. That is deliberate.
Until your declaration is recorded there, the daily pipeline publishes nothing about you, so a maintainer credit without one reads as an anonymous contributor with no hover panel at all. Your commits still carry your name inside the repository, as they do in any repository, but the website does not repeat it. A detail you did not release is not merely hidden: it is never fetched from your profile and never written down anywhere. Writing role: true next to your name in an asset does nothing either. Only the person a field describes can release it. A content file is not that person.
Two details are worth knowing before you tick the boxes. Your address only appears if you also made it public in your Git profile, because the API hands out a no-reply placeholder otherwise, and that is not a contact. Your contribution record is matched through the address on your commits, so it counts the commits you author under your own account. To change or withdraw any of it later, comment on your own declaration issue.
A pseudonym, a short form or just your initials are all fine in either place. Emptying the Full name works too: after the next mirroring run the maintainers credit shows “Anonymous contributor”, it never falls back to your username. If you would rather not have your private address in the commit history, set a no-reply identity in the same breath:
git config user.name "Your display name"git config user.email "your-username@noreply.scf-content.git.onstackit.cloud"Your address is never shown unless you ask for it: it appears only when a page lists it explicitly, or when you both made it public in your Git profile and the page opts in.
Install these two, in any order:
Nothing else gets installed. No Node, no pnpm, no build tools on your host.
With Docker Desktop you skip this section.
Point VS Code at podman. Open the settings (Ctrl + ,, on the Mac ⌘ + ,), search for dev containers path, change Dev > Containers: Docker Path from docker to podman, then restart VS Code. Without it the extension looks for a docker binary that is not there and the container never starts.
Give the machine memory and disk. The build and the test suite run inside the podman machine and the default one is too small for them. Set it up with room from the start:
podman machine init --memory 8192 --cpus 4 --disk-size 60podman machine startIf your machine already exists, adjust it afterwards:
podman machine stoppodman machine set --memory 8192 --cpus 4podman machine startOn Windows, do all of this inside WSL2 and clone into the Linux file system, for example ~/projects/scf-content.
A clone under /mnt/c/... looks like it works: the container starts, the site builds, the page loads. But file change events do not cross the Windows to Linux boundary reliably, so hot reload never fires and your edits appear to have no effect until you restart the server.
On the Git instance, open Settings, then Applications, then Generate new token. Grant exactly these permissions:
| Permission | Level | Needed for |
|---|---|---|
repository | Read and Write | cloning the content repo, pushing branches |
package | Read | pulling the prebuilt dev container image |
Above the permission list sits a dropdown called Repository and Organization Access. Leave it on All (public, private and limited). On “Public only” the token cannot see the private content repository at all, and cloning as well as the registry login fail with a 403 even though every permission above is set correctly.
Log in with your Git username and the token as the password, then pull the image:
docker login scf-content.git.onstackit.clouddocker image pull scf-content.git.onstackit.cloud/scf-core/scf-system:latestpodman is a drop-in replacement here: podman login and podman image pull take exactly the same arguments.
Pulling the image up front is optional, VS Code pulls it for you on the first container start. Doing it manually just makes the first start faster and shows you early whether the login worked.
The image is multi-arch: the same pull gives Intel and Windows machines the amd64 variant and Apple Silicon Macs the native arm64 variant, automatically. When you pull a newer image later, follow it with Rebuild Container in VS Code, because a plain reopen keeps the cached old container running. Superseded image versions pile up as untagged leftovers, so run docker image prune (or podman image prune) on your machine now and then to clear them out.
The content repository grants read access only, so your fork is the place you push to. Everybody works this way, Framework Core included. Open scf-core/scf-content and press Fork, then clone your copy with your Git username and the token as credentials:
git clone https://scf-content.git.onstackit.cloud/<your-username>/scf-content.gitcd scf-contentgit remote add upstream https://scf-content.git.onstackit.cloud/scf-core/scf-content.gitThe upstream remote is how you pull later changes from the shared repository into your fork.
One thing to know before you branch: your fork copies every branch this repository has on the day you fork it, half-finished ones included. Start new work from upstream/main and from nothing else, which is also why a fork that has fallen behind cannot get in your way. When you do want it up to date, your fork’s page shows a green banner with a button that does it in one click. On our instance that button still carries its untranslated label repo.sync_fork.button, so go by the green banner rather than by the wording. A branch you have kept for weeks wants main merged into it before you open the next pull request.
Open the folder in VS Code. It detects the dev container configuration and offers Reopen in Container, which is also available from the command palette. The first start pulls the image and takes a few minutes; every later start is quick.
Your clone is mounted into the prebuilt app as its content, which is why you can preview the complete site without ever touching the application repository.
You enter the token twice because two different tools remember it in two different places, and knowing where saves you a confusing afternoon later:
git fetch and git push against that host replays it silently.~/.config/containers/auth.json). The two do not share anything, which is why the registry login is its own step.There is no git logout. When you rotate a token, or signed in with the wrong account, git keeps replaying the stored login and never asks again — the fix is to clear the stored entry so the next fetch or push prompts fresh (in the VS Code terminal that prompt appears as an input box at the top of the window, not in the terminal):
printf "protocol=https\nhost=scf-content.git.onstackit.cloud\n\n" | git credential rejectOn Windows you can alternatively open the Credential Manager and remove the git:https://scf-content.git.onstackit.cloud entry there. To see which account macOS currently has stored for the host:
security find-internet-password -s scf-content.git.onstackit.cloud | grep acctYour commit identity is a separate thing entirely: git config user.name and user.email decide how your commits are labelled, the stored login only decides who you authenticate as when pushing.
In the container terminal, run:
hikeThe same thing is available as the VS Code task 🥾 Hike, Start Dev Docs. The site is forwarded to http://localhost:4321 with hot reload, so every save shows up in the browser within a second.
Type help to see the full tool belt:
| Command | What it does |
|---|---|
hike | dev server with hot reload on http://localhost:4321 |
summit | full production build |
panorama | serve the built site |
patrol | build plus the complete UI test suite, the same gate as your PR |
scout | how to update the dev container image |
Almost every failed setup comes down to one of these:
/mnt/c silently breaks hot reload. Work inside WSL2 and clone into the Linux file system.Branch off upstream/main rather than off your own main, then write:
git fetch upstreamgit switch -c content/short-description upstream/mainYour fork’s main falls behind the moment somebody else contributes, and a branch started on top of it drags that gap into your pull request. Fetching first costs a second and takes the question away entirely. When you do want the fork itself tidy, CONTRIBUTING has the commands for that.
For new pages, use the studios instead of copying frontmatter by hand:
http://localhost:4321/studio, writes a contributor profile, an asset, a trail or a framework page. It also loads an existing file and changes only what you edit, so everything you leave alone stays exactly as it was.http://localhost:4321/diagrambuilder, draws a diagram in the SCF design and saves it next to your page.Both run on your local dev server, and the SCF Studio runs on the dev site as well. It writes frontmatter that already satisfies the pipeline’s rules: a real description in the rewarded 120 to 160 character window, a category from the allowed list and at most 10 tags.
For the authoring rules behind the generated files, see the asset integration guide and the trail setup guide.
patrolpatrol reproduces what the pipeline runs: the production build, the UI test suite, and a walkthrough of every asset, trail and profile your branch touched. It takes a few minutes and saves you a review round, because a green patrol almost always means a green pull request.
Push your branch to your fork and open a pull request against main of the shared repository. The description arrives prefilled with three confirmations you have to tick: that you hold the rights to what you contribute, that it carries nobody’s personal data and nothing confidential, and that every link points at an official source. A separate check reads them and stays red until all three are ticked, so keep the prefilled text in place rather than replacing it with your own.
On the files your pull request touches, the pipeline checks:
<LinkCard> or <LinkChip>, and their on-site targets must exist — see the asset integration guideIt then builds the full site, runs the UI tests and posts a report on your pull request. A temporary, password-protected preview site is optional: tick the preview box in the description and your pages go up within fifteen minutes of the checks turning green, follow every push, then disappear when the pull request closes. Nothing depends on it, patrol shows you the same result locally.
A Framework Core reviewer approves and merges. You can also tick the automatic-merge box, then the merge happens on its own within ten minutes of an approval landing on a green pull request. Either way your content goes live with the next site deployment.
patrol runs locally what the pipeline runs: the build, the UI tests and a walkthrough of everything you changed. A few minutes here save a review round.
Contributing to the STACKIT Cloud Framework means writing content, not running an application. The whole docs app ships as a prebuilt dev container image, and your clone of the content repository is mounted into it. This guide takes you from having nothing installed to an open pull request.
Three things, and only the first two touch your machine:
A STACKIT account. It is the identity you log in with, and it onboards you automatically.
A container runtime and an editor. Docker Desktop or podman, plus Visual Studio Code with the Dev Containers extension.
An access token from the Git instance, which you create in a later step and use as your password for both cloning and pulling the image.
You never need access to the application repository. Everything the site needs to build, Node, the docs app, the diagram toolchain and the test browser, is already inside the image.
If you do not have a STACKIT login yet, create one first at accounts.stackit.cloud , then come back to the next step.
Use a personal work address for it, in the form firstname.lastname@company.com. The Git instance builds your username from the part before the @. You cannot change that username later.
If the login works but the Git instance rejects you afterwards, your account is probably not in the STACKIT organization that hosts the instance. Contact Framework Core and we will sort it out.
Log in once via the STACKIT IDP at scf-content.git.onstackit.cloud . That single login does two things:
@, so with a personal address it reads firstname.lastname.Contributing here is public. The site credits people by name in two places: the history timeline on every asset and trail, and the Maintainers block on the pages you are listed for. That is the point of the credit, and you decide which name it is.
Three separate sources feed it:
| Where | Comes from | You change it in |
|---|---|---|
| History timeline | the author of your commits, shown as who and when | git config user.name in your clone |
| Maintainers credit | the Full name of your STACKIT Git profile, mirrored daily once you have declared it | your Git profile |
| The profile panel that opens on hover | your biography, website, address and contribution record | your Git profile, once you have declared them |
Your commit messages never appear on the site. The timeline names the author and the date and nothing else, because a commit message is written for the repository rather than for a reader.
Nothing is shown until you release it yourself, your name included. You do that once, in a declaration: open an issue in the content repository with the Contributor declaration template and tick the details you want shown. Framework Core or your framework owner records the result in settings/contributor-members.json, which is the only place the site reads it from. You cannot edit that file yourself. That is deliberate.
Until your declaration is recorded there, the daily pipeline publishes nothing about you, so a maintainer credit without one reads as an anonymous contributor with no hover panel at all. Your commits still carry your name inside the repository, as they do in any repository, but the website does not repeat it. A detail you did not release is not merely hidden: it is never fetched from your profile and never written down anywhere. Writing role: true next to your name in an asset does nothing either. Only the person a field describes can release it. A content file is not that person.
Two details are worth knowing before you tick the boxes. Your address only appears if you also made it public in your Git profile, because the API hands out a no-reply placeholder otherwise, and that is not a contact. Your contribution record is matched through the address on your commits, so it counts the commits you author under your own account. To change or withdraw any of it later, comment on your own declaration issue.
A pseudonym, a short form or just your initials are all fine in either place. Emptying the Full name works too: after the next mirroring run the maintainers credit shows “Anonymous contributor”, it never falls back to your username. If you would rather not have your private address in the commit history, set a no-reply identity in the same breath:
git config user.name "Your display name"git config user.email "your-username@noreply.scf-content.git.onstackit.cloud"Your address is never shown unless you ask for it: it appears only when a page lists it explicitly, or when you both made it public in your Git profile and the page opts in.
Install these two, in any order:
Nothing else gets installed. No Node, no pnpm, no build tools on your host.
With Docker Desktop you skip this section.
Point VS Code at podman. Open the settings (Ctrl + ,, on the Mac ⌘ + ,), search for dev containers path, change Dev > Containers: Docker Path from docker to podman, then restart VS Code. Without it the extension looks for a docker binary that is not there and the container never starts.
Give the machine memory and disk. The build and the test suite run inside the podman machine and the default one is too small for them. Set it up with room from the start:
podman machine init --memory 8192 --cpus 4 --disk-size 60podman machine startIf your machine already exists, adjust it afterwards:
podman machine stoppodman machine set --memory 8192 --cpus 4podman machine startOn Windows, do all of this inside WSL2 and clone into the Linux file system, for example ~/projects/scf-content.
A clone under /mnt/c/... looks like it works: the container starts, the site builds, the page loads. But file change events do not cross the Windows to Linux boundary reliably, so hot reload never fires and your edits appear to have no effect until you restart the server.
On the Git instance, open Settings, then Applications, then Generate new token. Grant exactly these permissions:
| Permission | Level | Needed for |
|---|---|---|
repository | Read and Write | cloning the content repo, pushing branches |
package | Read | pulling the prebuilt dev container image |
Above the permission list sits a dropdown called Repository and Organization Access. Leave it on All (public, private and limited). On “Public only” the token cannot see the private content repository at all, and cloning as well as the registry login fail with a 403 even though every permission above is set correctly.
Log in with your Git username and the token as the password, then pull the image:
docker login scf-content.git.onstackit.clouddocker image pull scf-content.git.onstackit.cloud/scf-core/scf-system:latestpodman is a drop-in replacement here: podman login and podman image pull take exactly the same arguments.
Pulling the image up front is optional, VS Code pulls it for you on the first container start. Doing it manually just makes the first start faster and shows you early whether the login worked.
The image is multi-arch: the same pull gives Intel and Windows machines the amd64 variant and Apple Silicon Macs the native arm64 variant, automatically. When you pull a newer image later, follow it with Rebuild Container in VS Code, because a plain reopen keeps the cached old container running. Superseded image versions pile up as untagged leftovers, so run docker image prune (or podman image prune) on your machine now and then to clear them out.
The content repository grants read access only, so your fork is the place you push to. Everybody works this way, Framework Core included. Open scf-core/scf-content and press Fork, then clone your copy with your Git username and the token as credentials:
git clone https://scf-content.git.onstackit.cloud/<your-username>/scf-content.gitcd scf-contentgit remote add upstream https://scf-content.git.onstackit.cloud/scf-core/scf-content.gitThe upstream remote is how you pull later changes from the shared repository into your fork.
One thing to know before you branch: your fork copies every branch this repository has on the day you fork it, half-finished ones included. Start new work from upstream/main and from nothing else, which is also why a fork that has fallen behind cannot get in your way. When you do want it up to date, your fork’s page shows a green banner with a button that does it in one click. On our instance that button still carries its untranslated label repo.sync_fork.button, so go by the green banner rather than by the wording. A branch you have kept for weeks wants main merged into it before you open the next pull request.
Open the folder in VS Code. It detects the dev container configuration and offers Reopen in Container, which is also available from the command palette. The first start pulls the image and takes a few minutes; every later start is quick.
Your clone is mounted into the prebuilt app as its content, which is why you can preview the complete site without ever touching the application repository.
You enter the token twice because two different tools remember it in two different places, and knowing where saves you a confusing afternoon later:
git fetch and git push against that host replays it silently.~/.config/containers/auth.json). The two do not share anything, which is why the registry login is its own step.There is no git logout. When you rotate a token, or signed in with the wrong account, git keeps replaying the stored login and never asks again — the fix is to clear the stored entry so the next fetch or push prompts fresh (in the VS Code terminal that prompt appears as an input box at the top of the window, not in the terminal):
printf "protocol=https\nhost=scf-content.git.onstackit.cloud\n\n" | git credential rejectOn Windows you can alternatively open the Credential Manager and remove the git:https://scf-content.git.onstackit.cloud entry there. To see which account macOS currently has stored for the host:
security find-internet-password -s scf-content.git.onstackit.cloud | grep acctYour commit identity is a separate thing entirely: git config user.name and user.email decide how your commits are labelled, the stored login only decides who you authenticate as when pushing.
In the container terminal, run:
hikeThe same thing is available as the VS Code task 🥾 Hike, Start Dev Docs. The site is forwarded to http://localhost:4321 with hot reload, so every save shows up in the browser within a second.
Type help to see the full tool belt:
| Command | What it does |
|---|---|
hike | dev server with hot reload on http://localhost:4321 |
summit | full production build |
panorama | serve the built site |
patrol | build plus the complete UI test suite, the same gate as your PR |
scout | how to update the dev container image |
Almost every failed setup comes down to one of these:
/mnt/c silently breaks hot reload. Work inside WSL2 and clone into the Linux file system.Branch off upstream/main rather than off your own main, then write:
git fetch upstreamgit switch -c content/short-description upstream/mainYour fork’s main falls behind the moment somebody else contributes, and a branch started on top of it drags that gap into your pull request. Fetching first costs a second and takes the question away entirely. When you do want the fork itself tidy, CONTRIBUTING has the commands for that.
For new pages, use the studios instead of copying frontmatter by hand:
http://localhost:4321/studio, writes a contributor profile, an asset, a trail or a framework page. It also loads an existing file and changes only what you edit, so everything you leave alone stays exactly as it was.http://localhost:4321/diagrambuilder, draws a diagram in the SCF design and saves it next to your page.Both run on your local dev server, and the SCF Studio runs on the dev site as well. It writes frontmatter that already satisfies the pipeline’s rules: a real description in the rewarded 120 to 160 character window, a category from the allowed list and at most 10 tags.
For the authoring rules behind the generated files, see the asset integration guide and the trail setup guide.
patrolpatrol reproduces what the pipeline runs: the production build, the UI test suite, and a walkthrough of every asset, trail and profile your branch touched. It takes a few minutes and saves you a review round, because a green patrol almost always means a green pull request.
Push your branch to your fork and open a pull request against main of the shared repository. The description arrives prefilled with three confirmations you have to tick: that you hold the rights to what you contribute, that it carries nobody’s personal data and nothing confidential, and that every link points at an official source. A separate check reads them and stays red until all three are ticked, so keep the prefilled text in place rather than replacing it with your own.
On the files your pull request touches, the pipeline checks:
<LinkCard> or <LinkChip>, and their on-site targets must exist — see the asset integration guideIt then builds the full site, runs the UI tests and posts a report on your pull request. A temporary, password-protected preview site is optional: tick the preview box in the description and your pages go up within fifteen minutes of the checks turning green, follow every push, then disappear when the pull request closes. Nothing depends on it, patrol shows you the same result locally.
A Framework Core reviewer approves and merges. You can also tick the automatic-merge box, then the merge happens on its own within ten minutes of an approval landing on a green pull request. Either way your content goes live with the next site deployment.
Push your branch to your fork and open the pull request. The pipeline checks it, builds a preview site for the review and merges on its own after approval when you tick the box.
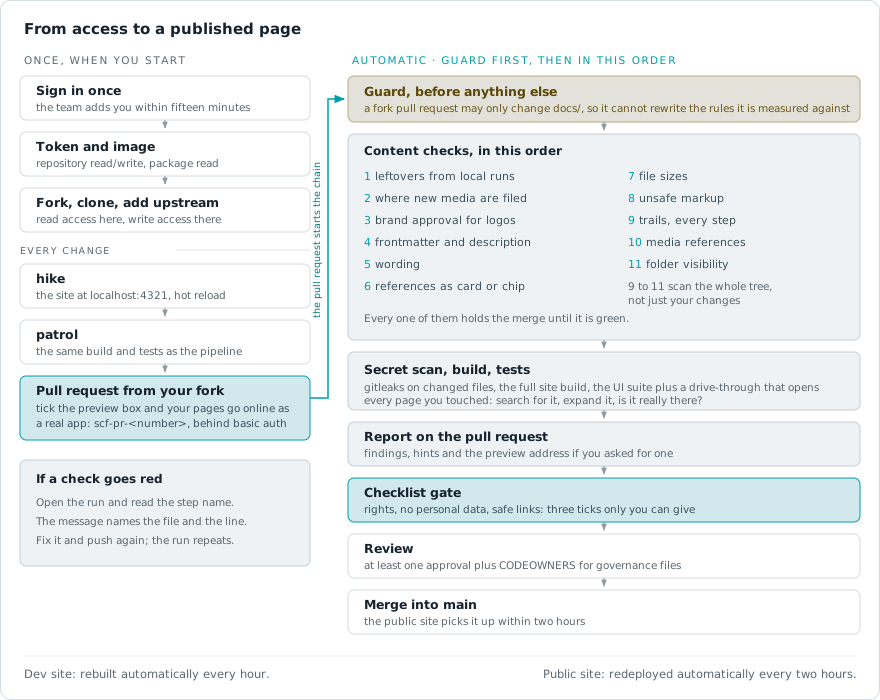
Contributing to the STACKIT Cloud Framework means writing content, not running an application. The whole docs app ships as a prebuilt dev container image, and your clone of the content repository is mounted into it. This guide takes you from having nothing installed to an open pull request.
Three things, and only the first two touch your machine:
A STACKIT account. It is the identity you log in with, and it onboards you automatically.
A container runtime and an editor. Docker Desktop or podman, plus Visual Studio Code with the Dev Containers extension.
An access token from the Git instance, which you create in a later step and use as your password for both cloning and pulling the image.
You never need access to the application repository. Everything the site needs to build, Node, the docs app, the diagram toolchain and the test browser, is already inside the image.
If you do not have a STACKIT login yet, create one first at accounts.stackit.cloud , then come back to the next step.
Use a personal work address for it, in the form firstname.lastname@company.com. The Git instance builds your username from the part before the @. You cannot change that username later.
If the login works but the Git instance rejects you afterwards, your account is probably not in the STACKIT organization that hosts the instance. Contact Framework Core and we will sort it out.
Log in once via the STACKIT IDP at scf-content.git.onstackit.cloud . That single login does two things:
@, so with a personal address it reads firstname.lastname.Contributing here is public. The site credits people by name in two places: the history timeline on every asset and trail, and the Maintainers block on the pages you are listed for. That is the point of the credit, and you decide which name it is.
Three separate sources feed it:
| Where | Comes from | You change it in |
|---|---|---|
| History timeline | the author of your commits, shown as who and when | git config user.name in your clone |
| Maintainers credit | the Full name of your STACKIT Git profile, mirrored daily once you have declared it | your Git profile |
| The profile panel that opens on hover | your biography, website, address and contribution record | your Git profile, once you have declared them |
Your commit messages never appear on the site. The timeline names the author and the date and nothing else, because a commit message is written for the repository rather than for a reader.
Nothing is shown until you release it yourself, your name included. You do that once, in a declaration: open an issue in the content repository with the Contributor declaration template and tick the details you want shown. Framework Core or your framework owner records the result in settings/contributor-members.json, which is the only place the site reads it from. You cannot edit that file yourself. That is deliberate.
Until your declaration is recorded there, the daily pipeline publishes nothing about you, so a maintainer credit without one reads as an anonymous contributor with no hover panel at all. Your commits still carry your name inside the repository, as they do in any repository, but the website does not repeat it. A detail you did not release is not merely hidden: it is never fetched from your profile and never written down anywhere. Writing role: true next to your name in an asset does nothing either. Only the person a field describes can release it. A content file is not that person.
Two details are worth knowing before you tick the boxes. Your address only appears if you also made it public in your Git profile, because the API hands out a no-reply placeholder otherwise, and that is not a contact. Your contribution record is matched through the address on your commits, so it counts the commits you author under your own account. To change or withdraw any of it later, comment on your own declaration issue.
A pseudonym, a short form or just your initials are all fine in either place. Emptying the Full name works too: after the next mirroring run the maintainers credit shows “Anonymous contributor”, it never falls back to your username. If you would rather not have your private address in the commit history, set a no-reply identity in the same breath:
git config user.name "Your display name"git config user.email "your-username@noreply.scf-content.git.onstackit.cloud"Your address is never shown unless you ask for it: it appears only when a page lists it explicitly, or when you both made it public in your Git profile and the page opts in.
Install these two, in any order:
Nothing else gets installed. No Node, no pnpm, no build tools on your host.
With Docker Desktop you skip this section.
Point VS Code at podman. Open the settings (Ctrl + ,, on the Mac ⌘ + ,), search for dev containers path, change Dev > Containers: Docker Path from docker to podman, then restart VS Code. Without it the extension looks for a docker binary that is not there and the container never starts.
Give the machine memory and disk. The build and the test suite run inside the podman machine and the default one is too small for them. Set it up with room from the start:
podman machine init --memory 8192 --cpus 4 --disk-size 60podman machine startIf your machine already exists, adjust it afterwards:
podman machine stoppodman machine set --memory 8192 --cpus 4podman machine startOn Windows, do all of this inside WSL2 and clone into the Linux file system, for example ~/projects/scf-content.
A clone under /mnt/c/... looks like it works: the container starts, the site builds, the page loads. But file change events do not cross the Windows to Linux boundary reliably, so hot reload never fires and your edits appear to have no effect until you restart the server.
On the Git instance, open Settings, then Applications, then Generate new token. Grant exactly these permissions:
| Permission | Level | Needed for |
|---|---|---|
repository | Read and Write | cloning the content repo, pushing branches |
package | Read | pulling the prebuilt dev container image |
Above the permission list sits a dropdown called Repository and Organization Access. Leave it on All (public, private and limited). On “Public only” the token cannot see the private content repository at all, and cloning as well as the registry login fail with a 403 even though every permission above is set correctly.
Log in with your Git username and the token as the password, then pull the image:
docker login scf-content.git.onstackit.clouddocker image pull scf-content.git.onstackit.cloud/scf-core/scf-system:latestpodman is a drop-in replacement here: podman login and podman image pull take exactly the same arguments.
Pulling the image up front is optional, VS Code pulls it for you on the first container start. Doing it manually just makes the first start faster and shows you early whether the login worked.
The image is multi-arch: the same pull gives Intel and Windows machines the amd64 variant and Apple Silicon Macs the native arm64 variant, automatically. When you pull a newer image later, follow it with Rebuild Container in VS Code, because a plain reopen keeps the cached old container running. Superseded image versions pile up as untagged leftovers, so run docker image prune (or podman image prune) on your machine now and then to clear them out.
The content repository grants read access only, so your fork is the place you push to. Everybody works this way, Framework Core included. Open scf-core/scf-content and press Fork, then clone your copy with your Git username and the token as credentials:
git clone https://scf-content.git.onstackit.cloud/<your-username>/scf-content.gitcd scf-contentgit remote add upstream https://scf-content.git.onstackit.cloud/scf-core/scf-content.gitThe upstream remote is how you pull later changes from the shared repository into your fork.
One thing to know before you branch: your fork copies every branch this repository has on the day you fork it, half-finished ones included. Start new work from upstream/main and from nothing else, which is also why a fork that has fallen behind cannot get in your way. When you do want it up to date, your fork’s page shows a green banner with a button that does it in one click. On our instance that button still carries its untranslated label repo.sync_fork.button, so go by the green banner rather than by the wording. A branch you have kept for weeks wants main merged into it before you open the next pull request.
Open the folder in VS Code. It detects the dev container configuration and offers Reopen in Container, which is also available from the command palette. The first start pulls the image and takes a few minutes; every later start is quick.
Your clone is mounted into the prebuilt app as its content, which is why you can preview the complete site without ever touching the application repository.
You enter the token twice because two different tools remember it in two different places, and knowing where saves you a confusing afternoon later:
git fetch and git push against that host replays it silently.~/.config/containers/auth.json). The two do not share anything, which is why the registry login is its own step.There is no git logout. When you rotate a token, or signed in with the wrong account, git keeps replaying the stored login and never asks again — the fix is to clear the stored entry so the next fetch or push prompts fresh (in the VS Code terminal that prompt appears as an input box at the top of the window, not in the terminal):
printf "protocol=https\nhost=scf-content.git.onstackit.cloud\n\n" | git credential rejectOn Windows you can alternatively open the Credential Manager and remove the git:https://scf-content.git.onstackit.cloud entry there. To see which account macOS currently has stored for the host:
security find-internet-password -s scf-content.git.onstackit.cloud | grep acctYour commit identity is a separate thing entirely: git config user.name and user.email decide how your commits are labelled, the stored login only decides who you authenticate as when pushing.
In the container terminal, run:
hikeThe same thing is available as the VS Code task 🥾 Hike, Start Dev Docs. The site is forwarded to http://localhost:4321 with hot reload, so every save shows up in the browser within a second.
Type help to see the full tool belt:
| Command | What it does |
|---|---|
hike | dev server with hot reload on http://localhost:4321 |
summit | full production build |
panorama | serve the built site |
patrol | build plus the complete UI test suite, the same gate as your PR |
scout | how to update the dev container image |
Almost every failed setup comes down to one of these:
/mnt/c silently breaks hot reload. Work inside WSL2 and clone into the Linux file system.Branch off upstream/main rather than off your own main, then write:
git fetch upstreamgit switch -c content/short-description upstream/mainYour fork’s main falls behind the moment somebody else contributes, and a branch started on top of it drags that gap into your pull request. Fetching first costs a second and takes the question away entirely. When you do want the fork itself tidy, CONTRIBUTING has the commands for that.
For new pages, use the studios instead of copying frontmatter by hand:
http://localhost:4321/studio, writes a contributor profile, an asset, a trail or a framework page. It also loads an existing file and changes only what you edit, so everything you leave alone stays exactly as it was.http://localhost:4321/diagrambuilder, draws a diagram in the SCF design and saves it next to your page.Both run on your local dev server, and the SCF Studio runs on the dev site as well. It writes frontmatter that already satisfies the pipeline’s rules: a real description in the rewarded 120 to 160 character window, a category from the allowed list and at most 10 tags.
For the authoring rules behind the generated files, see the asset integration guide and the trail setup guide.
patrolpatrol reproduces what the pipeline runs: the production build, the UI test suite, and a walkthrough of every asset, trail and profile your branch touched. It takes a few minutes and saves you a review round, because a green patrol almost always means a green pull request.
Push your branch to your fork and open a pull request against main of the shared repository. The description arrives prefilled with three confirmations you have to tick: that you hold the rights to what you contribute, that it carries nobody’s personal data and nothing confidential, and that every link points at an official source. A separate check reads them and stays red until all three are ticked, so keep the prefilled text in place rather than replacing it with your own.
On the files your pull request touches, the pipeline checks:
<LinkCard> or <LinkChip>, and their on-site targets must exist — see the asset integration guideIt then builds the full site, runs the UI tests and posts a report on your pull request. A temporary, password-protected preview site is optional: tick the preview box in the description and your pages go up within fifteen minutes of the checks turning green, follow every push, then disappear when the pull request closes. Nothing depends on it, patrol shows you the same result locally.
A Framework Core reviewer approves and merges. You can also tick the automatic-merge box, then the merge happens on its own within ten minutes of an approval landing on a green pull request. Either way your content goes live with the next site deployment.
Setup is a one-off; authoring is the part you will come back to. The onboarding journey walks through registering your contributor profile, the asset frontmatter schema, and chaining your assets into a trail of your own.
Tobias M.Head of STACKIT Cloud Framework · STACKITOwnerActive 12 of the last 12 weeks · 168 updateswww.linkedin.com/in/tobias-müller-011304172Tobias M.Head of STACKIT Cloud Framework · STACKITOwnerActive 12 of the last 12 weeks · 168 updatesSTACKITwww.linkedin.com/in/tobias-müller-011304172Contributed in STACKITTobias M.Tobias M.Head of STACKIT Cloud Framework · STACKITOwnerActive 12 of the last 12 weeks · 168 updatesSTACKITwww.linkedin.com/in/tobias-müller-011304172
· Sep 29, 2026
Tobias M.Tobias M.Head of STACKIT Cloud Framework · STACKITOwnerActive 12 of the last 12 weeks · 168 updatesSTACKITwww.linkedin.com/in/tobias-müller-011304172
· Sep 29, 2026
Tobias M.Tobias M.Head of STACKIT Cloud Framework · STACKITOwnerActive 12 of the last 12 weeks · 168 updatesSTACKITwww.linkedin.com/in/tobias-müller-011304172
· Sep 29, 2026
Tobias M.Tobias M.Head of STACKIT Cloud Framework · STACKITOwnerActive 12 of the last 12 weeks · 168 updatesSTACKITwww.linkedin.com/in/tobias-müller-011304172
· Sep 7, 2026
Tobias M.Tobias M.Head of STACKIT Cloud Framework · STACKITOwnerActive 12 of the last 12 weeks · 168 updatesSTACKITwww.linkedin.com/in/tobias-müller-011304172
· Aug 31, 2026
Tobias M.Tobias M.Head of STACKIT Cloud Framework · STACKITOwnerActive 12 of the last 12 weeks · 168 updatesSTACKITwww.linkedin.com/in/tobias-müller-011304172
· Aug 26, 2026
Tobias M.Tobias M.Head of STACKIT Cloud Framework · STACKITOwnerActive 12 of the last 12 weeks · 168 updatesSTACKITwww.linkedin.com/in/tobias-müller-011304172
· Aug 20, 2026
Tobias M.Tobias M.Head of STACKIT Cloud Framework · STACKITOwnerActive 12 of the last 12 weeks · 168 updatesSTACKITwww.linkedin.com/in/tobias-müller-011304172
· Jul 29, 2026
Tobias M.Tobias M.Head of STACKIT Cloud Framework · STACKITOwnerActive 12 of the last 12 weeks · 168 updatesSTACKITwww.linkedin.com/in/tobias-müller-011304172
· Jul 23, 2026